Procedure

  • Subscribe to our RSS feed.
  • Twitter
  • StumbleUpon
  • Reddit
  • Facebook
  • Digg

Friday, July 26, 2013

Put your passwords in your pocket and take them everywhere you go

Posted on 5:01 AM by Unknown
My own personal favorite password manager, Password Safe, isn't officially portable. But in practice, it sort of is.
After you install Password Safe onto a computer, you can drag and drop the program folder onto a flash drive and safely remove the drive. Then you can connect it to another Windows PC and launch Password Safe. You'll want to keep your password database file on the flash drive too, of course.
But this doesn't work perfectly. It has two flaws, neither of them serious.
First, when you launch Password Safe from the flash drive and browse to open a password database file, the program will default to your Documents folder. You'll have to navigate drives and folders to get to the file, which will be on the flash drive.
Second, when you close the program, it leaves an icon running in the notification area. You must right-click that icon and exit the program before Windows will allow you to safely remove the flash drive.
You can find unofficial portable versions of Password Safe around the Internet. I've tried a couple, and they both had these same two problems.
Password Safe isn't the only option. The popularKeepass program is available in a portable version, which lacks Password Safe's portable annoyances.
Another option: If you have a smartphone or a tablet, both Password Safe and Keepass are available as Android and iOS apps.
Source
Read More
Posted in | No comments

Thursday, July 18, 2013

Three cool ways to tweak File Explorer in Windows 8

Posted on 4:44 PM by Unknown
Microsoft may have bungled a few things with Windows 8 (snark reply: "Just a few?!"), but File Explorer isn't one of them.
For one thing, the file manager finally earned a home on the Taskbar (even if you have to switch to the desktop to find it). Even better, Microsoft endowed it with the now-familiar Ribbon interface, making for much easier navigation of your files (and Explorer itself).
However, I think it could be even better with a little tweaking. Here are three simple changes you can make to improve the File Explorer experience:

1. Customize the Quick Access Toolbar. See those tiny icons in the upper-left corner of the File Explorer window? Click the even tinier arrow next to them for a list of additional functions you can enable. Why add, say, a Delete icon when Explorer already has one? Because the latter appears only when you're viewing the Home tab. Put it on the Toolbar, however, and it's always just a click away.
2. Show all your folders. In an effort to keep things compact, Explorer shows an abbreviated list of your folders in the lefthand navigation pane. I'd rather see everything, which is possible by clicking the View tab, then the Navigation pane icon. Now simply clickShow all folders.
3. Improve your view. I find that very few users ever monkey with Explorer's default view for files, even though it's often very valuable to do so. Thankfully, Explorer now gives you a preview of what each view will look like, a huge boon to users who might get confused by a sudden change. Just click the View tab, then mouse over the various options in the Layout section: Extra large icons, List, Details, etc. In the file area you'll immediately see how that view would look. Like what you see? Click the setting to implement it.
Source
Read More
Posted in | No comments

Sunday, July 7, 2013

How to safely remove a USB drive even when Windows says it isn't safe to do so

Posted on 2:32 AM by Unknown
Windows' built-in solution usually works: Click the Safely Remove Hardware icon in the notification area (aka the system tray or the systray) and select the drive. When you get the "Safe To Remove Hardware" message, it's safe to remove the hardware.
But sometimes, "usually" isn't good enough, and Windows instead tells you that "This device is currently in use."

But Windows won't tell you what's using the device. Without that information, it's tough to know how to fix the problem.
Guessing makes a good start. Close all of your Windows Explorer windows, along with any programs that might be holding onto a file from the drive. Then try the Safely Remove Hardware icon again.
If that doesn't work, you can simply shut down your computer--not hibernate it or put it in sleep mode--but shut it down completely. That always works, but it takes time and interrupts your workflow.
In the original forum discussion, Flashorn offered an improved variation: Log off, log on, and try again. It's faster than a full shutdown and reboot, and it will probably close whatever process is causing the problem. But it still takes time.
Which is why I prefer Unlocker. Intended to help you free up files that Windows won't let you delete, it can also help free external drives. Unlocker doesn't cost anything, although you're encouraged to make a $5 donation.
Download and install the program. Then, the next time Windows tells you that a "device is currently in use," right-click the drive and select Unlocker. The program will tell you what process or processes are causing the problem.
It will also offer solutions. It can kill the process(es), but that can make Windows unstable. It can also try to unlock the files from one or all processes without killing them.
My favorite solution isn't on the Unlocker menu. Once you know what process is causing the problem, you can usually figure out what application you need to close--they generally have the same name. So you just close that program manually, saving all appropriate files, then use the Safely Remove Hardware icon again.
Source
Read More
Posted in | No comments

Wednesday, July 3, 2013

Here's what an eavesdropper sees when you use an unsecured Wi-Fi hotspot

Posted on 11:58 PM by Unknown
You’ve probably read at least one story with warnings about using unsecure public Wi-Fi hotspots, so you know that eavesdroppers can capture information traveling over those networks. But nothing gets the point across as effectively as seeing the snooping in action. So I parked myself at my local coffee shop the other day to soak up the airwaves and see what I could see.
My intent wasn't to hack anyone's computer or device—that's illegal—but just to listen. It’s similar to listening in on someone’s CB or walkie-talkie radio conversation. Like CBs and walkie-talkies, Wi-Fi networks operate on public airwaves that anyone nearby can tune into.
As you'll see, it’s relatively easy to capture sensitive communication at the vast majority of public hotspots—locations like cafes, restaurants, airports, hotels, and other public places. You can snag emails, passwords, and unencrypted instant messages, and you can hijack unsecured logins to popular websites. Fortunately, ways exist to protect your online activity while you’re out-and-about with your laptop, tablet, and other Wi-Fi gadgets. I'll touch on those, too.

Capturing webpages

I opened my laptop at the coffee shop and began capturing Wi-Fi signals, technically called 802.11 packets, with the help of a free trial of a wireless network analyzer. The packets appeared on screen in real time as they were captured—much more quickly than I could read them—so I stopped capturing after a few minutes to analyze what I had vacuumed up. Note: You can click on any of these screenshots to view larger versions that are easier to read.
My own website, captured via the hotspot packets and reassembled for viewing.
I first searched for packets containing HTML code, to see which websites other hotspot users were browsing. While I did see activity from other patrons, I didn’t capture anything interesting, so I visited my own website—www.egeier.com—on my smartphone.
This is a copy of the email I sent (and subsequently received) using my smartphone connected to the hotspot.
The raw packets with HTML code looked like gibberish, but as you can see above, the trial network analyzer I used reassembled the packets and displayed them as a regular webpage view. The formatting was slightly off and some of the images were missing, but plenty of information still came through.
I didn’t find anyone else sending or receiving emails during my visit, but I did discover the test messages I sent and received via my smartphone while it was connected to the hotspot. Since I use an app to connect to my email service via POP3 without encryption, you could have seen my login credentials along with the message (I've blurred the username and password in the screenshot).
This is all the information someone would need to configure their email client to use my account and start receiving my emails. They might also be able to send emails from my account.
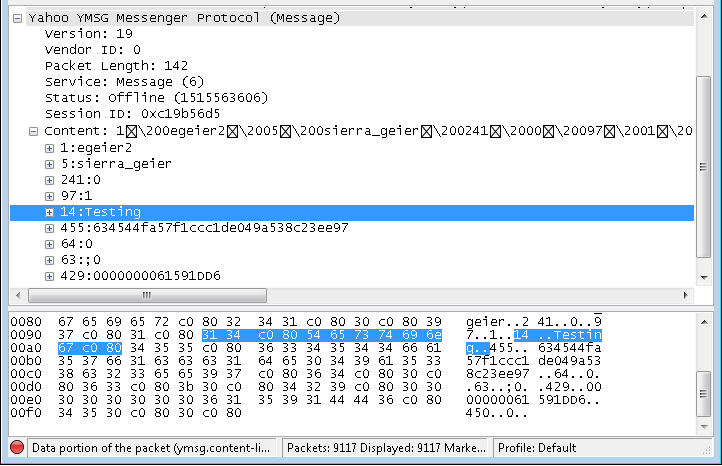
And these are the packets that went over the network when I sent an instant message using Yahoo Instant Messenger.
I also used Yahoo Messenger to send a message while I was capturing Wi-Fi signals. Sure enough, the tool plucked that information out of the air, too. You should never use an unencrypted instant-messaging service with any expectation of privacy.

Capturing FTP login credentials

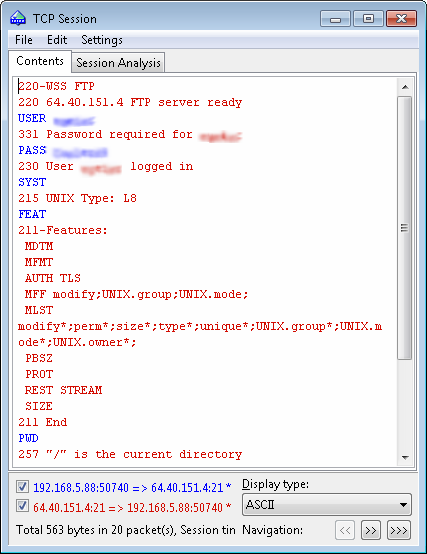
If you still use FTP (File Transfer Protocol) to download, upload, or share files, you should avoid connecting to them over unsecured hotspots. Most FTP servers use unencrypted connections, so both login credentials and content are sent in plain text, where any eavesdropper can easily capture them.
These captured packets reveal the username and password securing my FTP server (I've blurred them in this screenshot).
While using my laptop to connect to my own Web server’s FTP server, I was able to capture the packets containing my login ID and password—details that would have enabled any nearby eavesdropper to to gain unfettered access to my websites.

Hijacking accounts

Computers aren’t the only devices susceptible to eavesdropping. I also ran an app called DroidSheep on my spare rooted Android smartphone. This app can be used to gain access to private accounts on popular Web services, such as Gmail, LinkedIn, Yahoo, and Facebook.
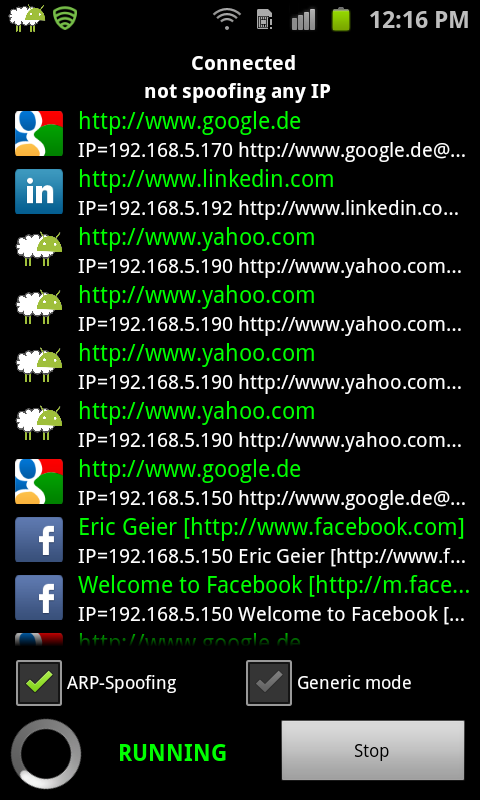
DroidSheep looks for and lists any unsecure logins to popular websites. While it doesn’t capture the passwords to those sites, it can exploit a vulnerability that allows you to open the site using another person’s current session, giving you full access to their account in the process.
As you can see from the screenshot below, DroidSheep detected Google, LinkedIn, and Yahoo logins from other people who were connected to the hotspot, as well as the Facebook login I made on my other smartphone.
DroidSheep detected other users' log-ins, which means those accounts were vulnerable to hijacking.

.
I couldn’t legally access other people’s logins, of course, but I did open my own Facebook login.
Using DroidSheep, I was able to access my own Facebook page without providing a user ID or password. I could have done the same with any other patron's accounts if they were logged in.
Once I’d done that, I could magically access my Facebook account on that rooted Android phone (see the screen at lower right) without ever providing my username or password from that device.

How to use Wi-Fi hotspots securely

Now that you’ve seen just how easy it is for someone to eavesdrop on your Wi-Fi, here's how you can use a public hotspot with some degree of security:
  • Every time you log in to a website, make sure that your connection is encrypted. The URL address should start with https instead of http.
  • You also need to make sure that the connection stays encrypted for all of your online session. Some websites, including Facebook, will encrypt your log-in and then return you to an unsecured session—leaving you vulnerable to hijacking, as discussed earlier.
  • Many sites give you the option of encrypting your entire session. You can do this with Facebook by enabling Secure Browsing in the Security settings.
  • When you check your email, try to login via the Web browser and ensure that your connection is encrypted (again, look for https at the beginning of the URL). If you use an email client such as Outlook, make sure your POP3 or IMAP and SMTP accounts are configured with encryption turned on.
  • Never use FTP or other services that aren’t encrypted.
  • To encrypt your Web browsing and all other online activity, use a VPN, or virtual private network (this article will show you how).
  • Keep in mind that private networks have similar vulnerabilities: Anyone nearby can eavesdrop on the network. Enabling WPA or WPA2 security will encrypt the Wi-Fi traffic, obscuring the actual communications, but anyone who also has that password will be able to snoop on the packets traveling over the network. This is particularly important for small businesses that don’t use the enterprise (802.1X) mode of WPA or WPA2 security that prevents user-to-user eavesdropping.
Source
Read More
Posted in | No comments

Sunday, June 30, 2013

How to boot to desktop mode in Windows 8.1

Posted on 5:44 PM by Unknown
One of my chief complaints with Windows 8 is that Microsoft forced you to boot to the new Start screen rather than giving you the option of booting to the desktop--which is where I prefer to hang my computing hat.
You could work around this using any number of utilities (most of which were designed primarily to restore the missing Start button, essential if you are working in Desktop), but with the release of Windows 8.1, Microsoft has added the capability.
In other words, now you can boot directly to the desktop. It's not immediately obvious how--Microsoft still doesn't outfit Windows with any "guides to new features" or the like, a silly oversight--but at least it's easy once you know the steps.
1. After booting Windows 8.1 (here's how to get the preview if you don't already have it), click the Desktop tile to enter Desktop mode.
2. Right-click any open area in the taskbar, then click Properties.
3. Click the Navigation tab, then check the box next to Go to the desktop instead of Start when I sign in.
4. Click OK, then reboot. Windows should plunk you right into Desktop.
And that's all there is to it. If you want to go back to Start-screen booting, just repeat the process and uncheck the box in step 3. (Also, if you don't have a Navigation tab, leave a comment letting me know. This appears to be an issue for some users. I'm investigating why.)

Source
Read More
Posted in | No comments

Thursday, June 20, 2013

Five surefire ways to maximize your laptop's battery life

Posted on 10:19 PM by Unknown
You adore your laptop. It lets you get down to business wherever you happen to be—airport lounge, coffee shop, your home office. It’s the key to your competitive edge.
That is, until its battery croaks. Just as you’re putting the final details on your PowerPoint presentation. At the airport. Two hours before takeoff. And with no power outlet in sight. At that instant, you begin to wonder why you ever bought the ever-lovin’ boat anchor in the first place.
But love will bloom anew as soon as you recharge. Avoid the heartache, however temporary: Follow these five tips for maximizing your laptop’s run time.
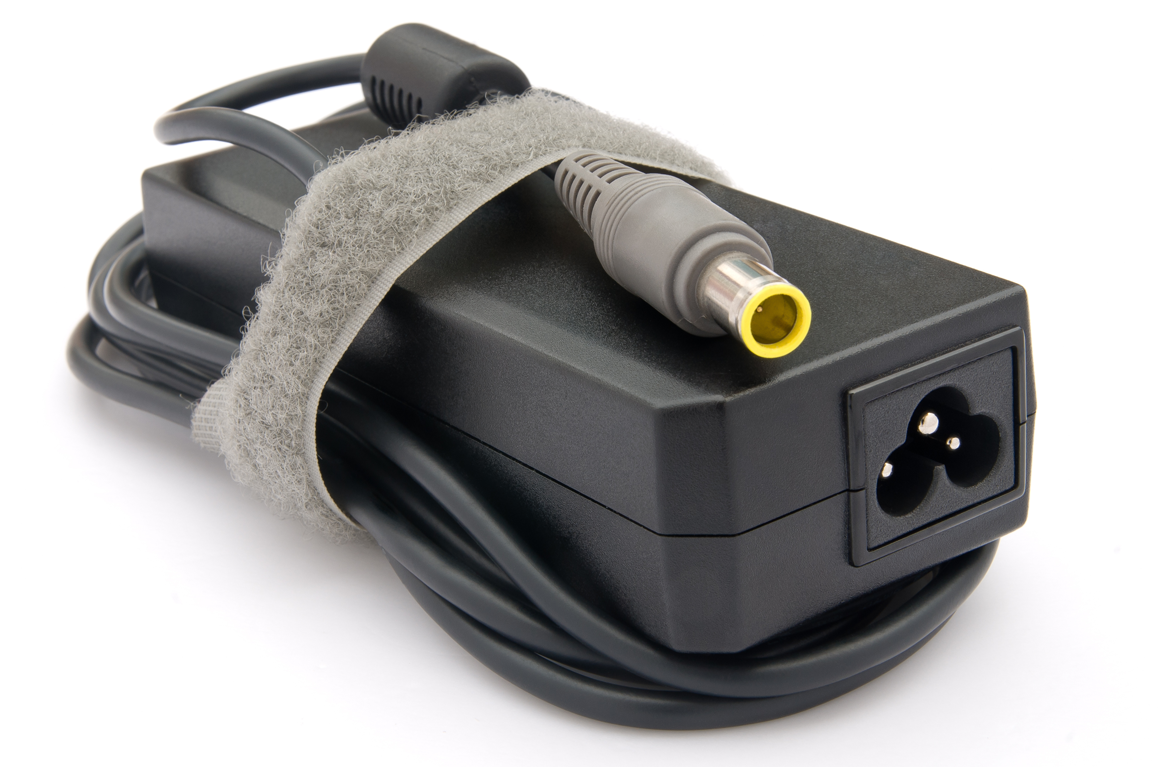
Never miss an opportunity to plug your laptop into an AC outlet to top off its battery.

1. Plug in whenever possible

One surefire way to ensure that your laptop is always ready for action is to plug it into an AC outlet whenever possible. Keeping the machine fully charged makes it far more likely that you will always have the juice you need to complete your work. Purchase at least one extra AC adapter, so you’ll always have one in your office and one in your laptop bag for travel. If you work at home frequently, consider buying a third adapter to leave there.
Terminate the offending process by right-clicking it and selecting ‘Kill Process’.
A common misconception about laptops is that leaving the system plugged into AC power continuously will overcharge or shorten the life of its battery. Given that the lithium cells used in modern laptops will either catch fire or explode if overcharged, this is obviously not true. Lithium ion batteries stop charging once they reach full capacity, and keeping the battery charged reduces wear and tear on the power source, lengthening its useful life span.

2. Adjust the screen brightness

Modern displays with LED backlights are a major improvement over the CCFL (cold cathode fluorescent tube) backlit displays of yesteryear, in terms of both picture quality and power efficiency. Still, a laptop’s display claims a significant percentage of the power that the system consumes. As such, keeping the screen backlight low can increase your laptop’s run time noticeably. You should also take care in choosing where you work: A low backlight setting will be far more comfortable in a cafĂ© with soft lighting than in a brightly lit room.
Be aggressive in conserving power while your laptop is running on battery.
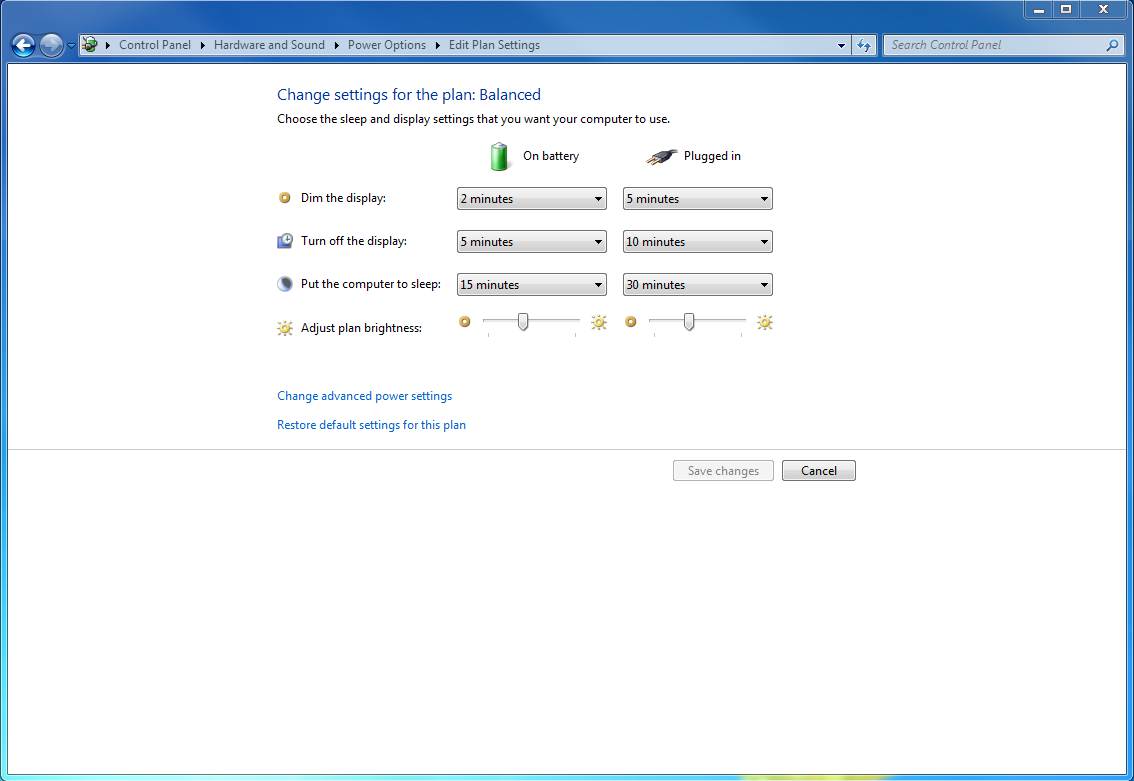
Another way to reduce the power the display consumes is to tweak the automatic backlight controls in Windows. Open Control Panel, choose Hardware and Sound > Power Options,and click Change plan settings for the active power plan. Choosing an aggressive timeout of 1 to 3 minutes under the ‘Dim the display’ and ‘Turn off the display’ options while the machine is operating on battery power will eke out more battery life by dimming or switching off the screen after the specified amount of inactivity. You can also click theChange advanced power settings option to set the level of brightness when the laptop is in the dimmed state.

3. Track down errant apps

One culprit often responsible for draining the battery ahead of its time is the presence of errant software applications that suck up disproportionate processor cycles. Unnecessary utilities running in the background, or an app that is hanging, can also cause this effect. Web browsers are particularly prone to the latter problem, due to the multiple plug-ins, rendering engines, and scripting engines embedded within them.
Use the tabs in Windows Task Manager to identify and kill errant programs that are sucking up battery life unnecessarily.
Modern CPUs save power by dynamically scaling back their clock speed to the minimum possible, but they can do so only when apps aren’t active. If you fail to deal with rogue apps, they will not only drain battery power—they might also slow down your entire system. One clue to the existence of an errant app is if your laptop fan frequently kicks into high gear when the machine should be idle.
Resolving the problem is relatively straightforward: Press the Ctrl-Alt-Delete key combination, launch Windows Task Manager, and use it to identify processes that are showing unexplained high utilization. If a program won’t exit normally, terminate the offending process by right-clicking it and selecting Kill Process. For Web browsers, shutting off all instances usually works. Should all else fail, perform a system restart.

4. Disable intensive background apps

Errant apps aside, applications that make intensive use of the processor or network should remain closed when your laptop isn’t plugged in. Peer-to-peer software such as BitTorrent clients and computationally intensive applications such as distributed-computing projects (Folding@Home, for example) are out. You can also confirm that Windows Update and other software updaters are not attempting to download large software patches.
Disabling automatic Windows Update functions outright is too draconian (particularly if you forget to reinstate the feature later), but periodically checking on your network usage for unexplained spikes will allow you to identify and stop large file transfers before they gobble up precious minutes of battery life.

5. Disable unneeded devices

You can disable unneeded hardware devices or ports to squeeze out a few more minutes of power, although this option isn’t possible with every laptop. Start by disabling unneeded wireless capabilities, such as built-in data modems and Wi-Fi and Bluetooth radios (many laptops have hardware switches for this purpose).
The optical-disc drive is another power guzzler that can drain batteries fast, so don’t leave a DVD or Blu-ray disc in the drive if you don’t need it. Finally, many laptops these days come with backlit keyboards; these are great when you’re in a dark environment, but you can save precious power by doing without the feature when your laptop is running on battery power.
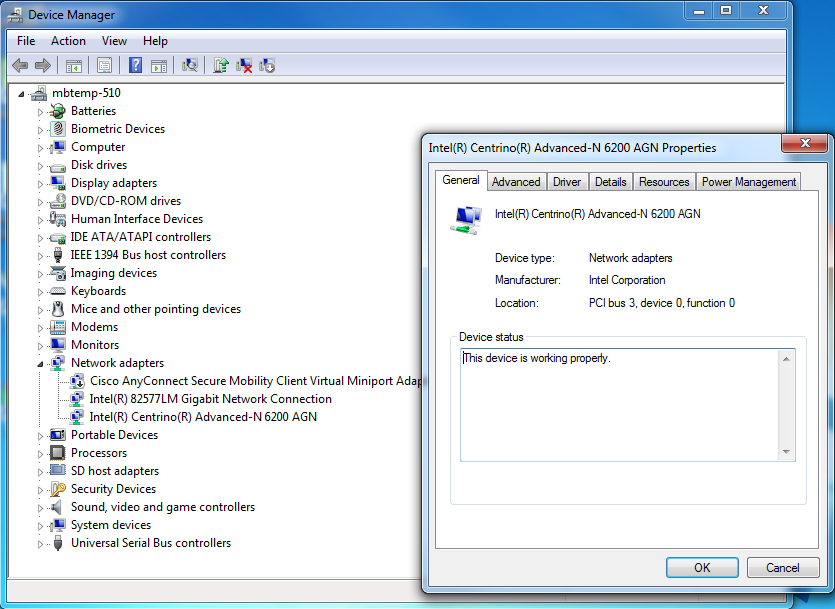
Depending on your laptop model, you may be able to use Device Manager to disable unnecessary devices and ports.
Source
Read More
Posted in | No comments

Sunday, June 9, 2013

Add a Wi-Fi hotspot to Windows 8 with Virtual Router Plus

Posted on 2:34 AM by Unknown
Recently I spent a full week in a hotel, where I grudgingly paid for Wi-Fi so I could get some work done. Unfortunately, it was a per-device purchase: Only my laptop could get online. If I wanted Internet access on my phone (which had a weak indoor signal) and tablet (Wi-Fi only), I'd have to pay again. And again.
Hey, wait a minute, doesn't Windows let you set up a Wi-Fi hotspot to share its connection with other devices? It did, in Windows 7; it doesn't in Windows 8. Actually, the capability is still there, but enabling it requires some serious command-line tinkering.
Fortunately, I found Virtual Router Plus, a free utility that adds Wi-Fi hotspot capabilities to Windows 8. It works, but with a few important caveats.
First, be really careful during setup. The price of "free" here is that the installer comes packed with junkware. It's easy enough to bypass if you pay attention, but potentially troublesome if you don't.
On the first screen, choose Custom Installation, then uncheck the box below it. When you click Next, a pop-up will appear; click Cancel. Click Next again, then clear yet another checkbox. Now you're good to go with a clean install. Oy.
When you run the program, it'll pop open a help page in your browser, which you may need to verify whether you have the required device drivers. But skip that for now; instead, try using the utility.
To do so, give your network a name (i.e. SSID), then enter a password (to keep freeloaders out). Finally, choose the connection you want to share (which is probably whatever appears as the default). Now click Start Virtual Router Plus.
After a few moments, you should be able to detect your new network from your phone, tablet, or even another PC. But don't worry: your laptop will retain its own Internet connectivity at the same time.
As I noted before, the utility worked as advertised, but it did create one problem: I could no longer connect to the various virtual private networks (VPNs) I use. Your mileage may vary, and if you don't work with VPNs, you're golden. As for me, I unfortunately had no choice but to uninstall the utility to regain access.
From
Read More
Posted in | No comments
Newer Posts Older Posts Home
Subscribe to: Posts (Atom)

Popular Posts

  • The Ubuntu guide for displaced Windows users
    With Windows 8 pushing a “touch-first” desktop interface—Microsoft’s  words , not ours—and with Valve’s  Steam on Linux  beginning to bring ...
  • Backing up your entire drive: Cloning vs. imaging
    Both cloning and imaging create an exact record of your drive or partition. I'm not just talking about the files, but the master boot re...
  • Will Samsung top Apple by withholding revolutionary tech?
    Samsung is drawing closer and closer to the technology that will transform the future of smartphones and  tablets . The company will show of...
  • Obama opposes Silicon Valley firms on immigration reform
    President Obama opposes an immigration reform bill backed by companies including Apple, Microsoft, and Adobe that would let U.S.-educated co...
  • Word vulnerability tops Microsoft's targets for Patch Tuesday
    A flaw in  Microsoft  Word ranks among the top security problems addressed by December's Patch Tuesday fixes, closing a hole that allows...
  • How to make Ubuntu Linux look like Windows 7
    Windows 8's tile-based interface puts a bold new spin on the familiar Windows interface—so bold that many long-time Windows users are th...
  • How to optimize Windows 8 on old hardware (2)
    Disable unnecessary items To further optimize Windows 8 on older hardware, we recommend disabling as many unnecessary startup items and serv...
  • How To Install MacOS On Windows Vista
    If you still think that you need macintosh computer to try MacOS, that's already in the past. Now you can try MacOS on Windows Vista. Ho...
  • Feds: MegaUpload was not entrapped
    Entrapment is one of MegaUpload's claims in its legal battle against the U.S. government. The feds are now saying this claim is "ba...
  • What it really takes to make a flexible phone (Smartphones Unlocked) Read more: http://www.cnet.com/8301-17918_1-57567014-85/what-it-really-takes-to-make-a-flexible-phone-smartphones-unlocked/#ixzz2JqPL5i4n
    A bendable screen is nice in the lab, but it will take more than flexi-glass to get your phone to touch its toes. Had Dr. Dipak Chowdhury kn...

Categories

  • apple
  • browser
  • buy
  • christmas
  • computer information
  • crack
  • cyber monday
  • download
  • files
  • firewall
  • flash disk
  • font
  • graphene
  • hard disk
  • hidden
  • Hot News
  • how to
  • intel
  • Internet
  • Internet Explorer
  • iOS
  • iPad
  • Mac
  • Malware
  • nokia
  • notebook
  • play station 4
  • processor
  • removal
  • safe
  • samsung
  • samsung. microsoft
  • security
  • sony
  • ssd
  • The Meaning Is
  • tips
  • twitter
  • ubuntu
  • video card
  • virus
  • vulnerability
  • What to do
  • windows 8
  • windows7

Blog Archive

  • ▼  2013 (90)
    • ▼  October (2)
      • How to avoid common PC building mistakes
      • Defective RAM can cause all sorts of problems. If ...
    • ►  September (6)
    • ►  August (3)
    • ►  July (4)
    • ►  June (5)
    • ►  May (9)
    • ►  April (14)
    • ►  March (11)
    • ►  February (17)
    • ►  January (19)
  • ►  2012 (27)
    • ►  December (22)
    • ►  November (5)
  • ►  2010 (4)
    • ►  June (1)
    • ►  January (3)
  • ►  2009 (32)
    • ►  December (2)
    • ►  November (11)
    • ►  October (11)
    • ►  September (2)
    • ►  March (2)
    • ►  February (4)
  • ►  2008 (39)
    • ►  October (2)
    • ►  September (2)
    • ►  August (1)
    • ►  June (1)
    • ►  May (3)
    • ►  March (1)
    • ►  February (7)
    • ►  January (22)
  • ►  2007 (46)
    • ►  December (8)
    • ►  November (9)
    • ►  September (4)
    • ►  August (2)
    • ►  July (9)
    • ►  June (14)
Powered by Blogger.

About Me

Unknown
View my complete profile