Procedure

  • Subscribe to our RSS feed.
  • Twitter
  • StumbleUpon
  • Reddit
  • Facebook
  • Digg

Friday, September 27, 2013

Learn to build a PC in under two minutes

Posted on 12:19 AM by Unknown


Building a computer is a great way to get a custom configuration, save some money and have fun. In this how-to video, we'll show you how to build one in less than two minutes.

PC components

  • Asus Z87-A motherboard - $140
  • Intel Core i5-4430 Haswell 3.0GHz quad-core processor - $190
  • G.SKILL Ripjaws X Series 8GB DDR3 SDRAM - $80
  • Radeon HD 5450 graphics card - $30
  • Rosewill wireless card - $10
  • Seagate Barracuda 1TB hard drives (x2) - $70 each
  • Optical drive - $20
  • Antec 550W power supply - $65
  • Corsair 400R mid tower - $100
  • Asus PB278Q 27" LED monitor with speakers - $550
  • Logitech M705 wireless mouse - $40
  • Logitech K120 keyboard - $11
  • Windows 7 Home Premium - $75
Total: $1,451
First, lay the case on its side and install the motherboard. It may require spacing screws in order to make it level with the cutouts on the back of the case, but either way be sure to secure the motherboard to the case using the supplied screws.
Put the memory into the slots recommended in the motherboard's manual. Make sure the memory clicks into place and is secure.
Add the CPU, which is the most important and most delicate part of the computer. Handle it by its sides and then add the processor to the motherboard and secure it using the clamp.
Add some thermal paste which will help transfer heat from the CPU to the heat sink. Then add the heat sink and fan. Check the motherboard's manual on where to plug the fan into for power.
Add any PCI cards into the corresponding slots. We'll install a wireless card and a graphics card. Those can go into any of the empty slots, just make sure they're accessible from the back of the case.
All of the components will need power so connect the power supply, which typically goes at the bottom of the case. Tighten the screws to hold it in place. Then connect the power supply to the various components.
Then add the hard disk drives and optical drive. Those will usually slide into the bays and either click into place or need to be secured using screws.
Hard drives and optical drives will need both data and power cables. Power cables will come from the power supply and data from the motherboard.
After installing all of the components, connect the monitor, keyboard and mouse and then hit the power button on the case. Keep the cover off the case to monitor the start up.
If it's all installed correctly the BIOS screen should appear. Choose the option to boot from the optical drive. Insert the Windows disc and restart the computer.
Source
Read More
Posted in | No comments

Thursday, September 26, 2013

Google Chrome update: How to access apps and recently closed tabs

Posted on 12:02 AM by Unknown
Today, Google rolled out a Chrome update that not only relocates that useful option, but also simplifies the browser's new-tab interface.
Let's take a look. In the past, when you opened a new tab (either by pressing Ctrl-T or clicking the new-tab button), you'd see one of two pages: a collection of Chrome apps or a bunch of thumbnails for your most-visited sites.
That was kind of a hassle, having to switch between the two. Now, everything is accessible from a single, more unified, page.
Specifically, when you open a new tab, you'll see the Google Search bar. Below that, your most-visited sites, again in thumbnail form.
As for apps, you can access them by clicking in either of two places. The first is the newly added apps shortcut that was added to your bookmarks bar. (If you don't use that bar, obviously you won't see it.) Clicking that shortcut reveals the old apps screen you're familiar with.

However, if you merely want quick access to Google apps (Maps, YouTube, Gmail, etc.), you can click the little apps shortcut in the top-right corner of the new-tab page. That reveals a pop-down menu with nine of the most popular Google apps, with others available by clicking More.
Finally, Chrome's "Recently closed" menu, which used to reside in the bottom-right corner of the new-tab window, has been relocated to the Chrome menu--the little three-line icon at the far right of the address bar.
Click it, then mouse over Recent Tabs for a fly-out menu with your recently closed tabs and tabs from other devices. I'm not sure this is more convenient than the old setup, but it does make for a more unified, less scattered interface--and that I like.
Source
Read More
Posted in | No comments

Thursday, September 19, 2013

Understanding tech language: The difference between malware and a virus

Posted on 3:45 PM by Unknown
The word malware (malicious software) describes any piece of code designed to infect your computer (or mobile device) and make it do things that you don't want it to do, such as mass-mail spam or steal your banking passwords. Trojans, worms, and rootkits are all types of malware.

And so is a virus, in its most technically-correct meaning. A virus is malicious code that spreads by infecting existing files, similar to the way a biological virus spreads by infecting living cells.
Once common, true computer viruses have become quite rare. Criminals have found better ways to spread malicious code.
So if viruses are rare, why do people still talk about them? And why do we still run antivirus programs?
Viruses were the dominant form of malware in the 1980s and 90s, when personal computers were first becoming common. At that time, there was no commonly-used umbrella term such as malware, so people called any malicious program a virus.
And the word has stuck. Although that program you keep running in the background protects you (hopefully) from all forms of malware, it's called antivirus because that type of program has always been called antivirus.
Source
Read More
Posted in | No comments

Tuesday, September 17, 2013

Why you may want a desktop instead of a laptop

Posted on 1:28 AM by Unknown
Laptops long ago surpassed desktops in sales, and tablets and smartphones are taking major market share from laptops. The tendency is clearly towards smaller, lighter, and more portable computing. But there are some good reasons to stick with a big box that sits on or below your desk.
First off, there's the price/performance ratio. Whether you're spending $300 or $3,000, you will get a more powerful computer for your money if you're willing to give up portability.

You have more upgrade options with a desktop. Most laptops will let you easily add RAM and swap out the hard drive. But your average desktop can take more RAM than your average laptop. And with a desktop's multiple bays, your drive options open up considerably. For instance, you don't have to choose between an SSD and a hard drive on a laptop; you can have both. Upgrading a CPU or graphics card--reasonably easy tasks on a desktop--are difficult to impossible (usually impossible) on a laptop.
Which brings up the issue of repair. It's easy to open up a desktop PC, check to make sure the cables are secure, clean out the dust, remove a broken part, and replace it with something generic. Laptop repair takes considerable skill, and many parts are specific to that model.
On the other hand, laptops are portable. That's a very good reason to buy one. They also use less electricity.
At first glance, desktops have an ergonomic advantage, thanks to the big screen and full-sized keyboard. But not really. At least when you're home or in the office, you can plug that screen and keyboard into your laptop.
Source
Read More
Posted in | No comments

Friday, September 13, 2013

Your Twitter account has been hacked! Here's what to do about it

Posted on 6:19 PM by Unknown
The first thing you need to do is try to log onto Twitter. If you can do that, change your password. This will stop the Twitter thief in his or her tracks, and regain you control of your account--if the thief hasn't already changed the password and locked you out.


If you can log onto Twitter in your browser, click the tool icon in the upper-right corner and select Settings. Click Password  on the left pane, then enter your old and new passwords. And please, make your new password is a strong password.
If you can change the password, you have my permission to sigh with relief. But your work isn't over. Keep reading.
If you can't log on or change your password, you're going to have to go through Twitter's customer service and submit a Support request. See the service's own My account has been hacked page for details.


Once you've changed the password--either on your own or with Twitter's help--send out a tweet apologizing to your followers. Explain to them that those tweets weren't yours.
Then delete all of the tweets you didn't send.
Next, block all third-party apps from accessing your account. Click Apps on the Settings page's left panel. Click Revoke access for every application. You can reactivate them later.
As added protection, setup Login verification:
  1. Click Mobile on the left pane.
  2. Click the add a phone link. Enter your cell number and click Activate phone. Follow the resulting directions (you'll be asked to text something).
  3. Look at the phone options and uncheck any that may invade your privacy or become annoying (I unchecked everything).
  4. Click Save changes.
  5. Click Account on the left panel.
  6. Scroll to the bottom and, in the Login verification section, select Send login verification requests to [your phone number]. Let them send you a test message and respond appropriately.
Now about those apps. Go back to the Apps section and click the Undo Revoke Access buttons for each app--or at least the ones you actually use.
Next, change your password for those apps--especially the ones on your tablet and phone. Unfortunately, thanks to login verification, this will be a bit more complicated than it used to be, and requires a PC handy:
  1. On your PC, on Twitter's Settings page, return to the Password section and click the Generate button. A numeric code will appear on the screen.
  2. On your mobile device, launch your Twitter app and tell it you need to change the password. But instead of entering the new (or old) password, enter the numeric code displayed on your PC.
Source
Read More
Posted in | No comments

Friday, August 16, 2013

How to clean and secure your browser like a pro

Posted on 11:05 PM by Unknown
The Internet runs on ads, but when you see them in your browser, your first instinct should be to run the other way—fast. The lion’s share of the Internet is wallpapered with tacky ads that invite you to “Lose 15 lbs. with this 1 weird tip” and load your browser with spyware in the process. In other corners of the Web, you might download a free game or a piece of music from an untrustworthy site, ending up with malicious adware that hitched a ride along with it.
Legitimate sites do a decent job of screening their advertisers, weeding out those that spread viruses, malware, or scams. But even a single instance of malicious adware on your PC can inject bad ads into otherwise innocuous websites. Worse, the adware can change your homepage and redirect your searches and the URLs you try to visit. I’ve deep-cleaned countless PCs, and almost every time I remove viruses and malware from a machine, I find that adware was previously installed.

WIKIPEDIA
If you’re seeing ads on otherwise ad-free sites like Wikipedia, your PC probably has a bad case of adware infection.
That’s how an adware infection starts. It ends when you take a minute to deep-clean the PC, eliminating unwanted browser toolbars, add-ons, extensions, and homepage- and search-hijacking malware.

Run virus and malware scans

Obviously, the very first thing you should do when you think your PC has a malware infection is to run a complete scan with an updated antimalware utlity. Since no antivirus program can catch all the millions of infections, use a secondary scanner such as Ad-Aware, Malwarebytes, Spybot Search & Destroy, or SuperAntiSpyware. The scans may detect additional adware, viruses, and other malware. With luck, your antimalware utilities can eliminate unwanted ads, browser toolbars, and browser-hijacking malware in one go.

Disable browser toolbars

If your browser is still acting up, you need to remove every toolbar you don’t use. I recommend eliminating all downloadable toolbars from your browser. Google’s Chrome browser already includes an address bar that’s also a search engine box and a customizable bookmark menu. Legitimate toolbars from sites such as Yahoo can offer some timesaving features, especially if you’re really into Yahoo Sports or another proprietary service.
Problem is, the vast majority of adware networks on the Web aren’t ethical, and they don’t offer any useful services. Their search bars and website shortcuts almost always lead unwary users to their adware network. You’re better off eliminating every toolbar from your browser, wiping out visual clutter and a potential vector for malware. Your browser will probably show a speed boost, too.
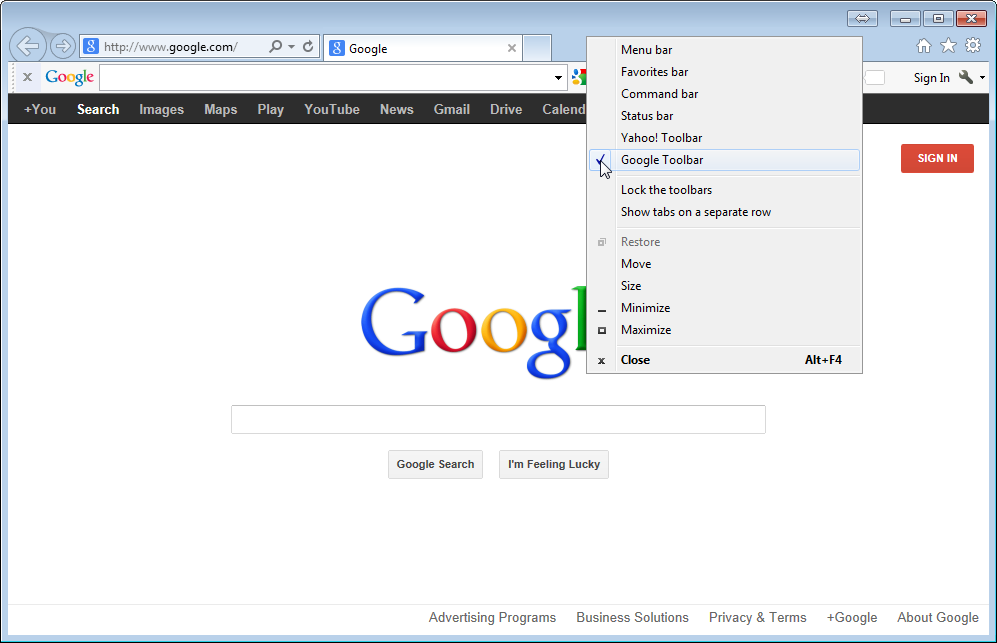
A simple right-click on your toolbar menu allows you to disable any and all unwanted toolbars by unchecking them.
To remove toolbars from Internet Explorer, just right-click the toolbar to produce the context menu and then deselect the unwanted toolbars in the list. If prompted, make sure to selectDisable.
Firefox works much the same way—simply right-click a toolbar and switch it off—but because the browser merely hides the toolbar in question instead of disabling it completely, the toolbar could still be responsible for displaying adware. Worse, Google’s Chrome browser doesn’t offer a right-click control option at all. For disabling toolbars in Firefox and Chrome, read the next section on checking browser extensions and add-ons.

Double-check every extension and add-on

Along with toolbars, adware networks can trick visitors into installing browser add-ons and extensions to inject ads, perform search redirection, and force you to use their site as your homepage. That’s why it’s smart to check your browser add-ons and extensions regularly, disabling those you don’t use and those that look suspicious.
Internet Explorer makes it easy to disable every extension and add-on you don’t recognize or need.
In Internet Explorer, open the Tools menu and select Manage add-ons. In the menu that opens, select All add-ons. Review the list. To disable an item, right-click it and selectDisable.
If you’re a Firefox user, click the orange menu button in the top-left corner of your browser and select Add-ons from the list. Next, review both the Extensions section and the Plug-ins section, disabling anything that looks suspicious.
In Firefox, check both the Extensions and Plug-in sections.
In Chrome, simply type chrome://extensions/ into the address bar. Alternatively, open the main menu by clicking the control button in the top-right corner of the browser, and then select Settings and click Extensions. Uncheck every extension you wish to disable, or click the trash-can icon next to each extension to remove it from Chrome entirely.
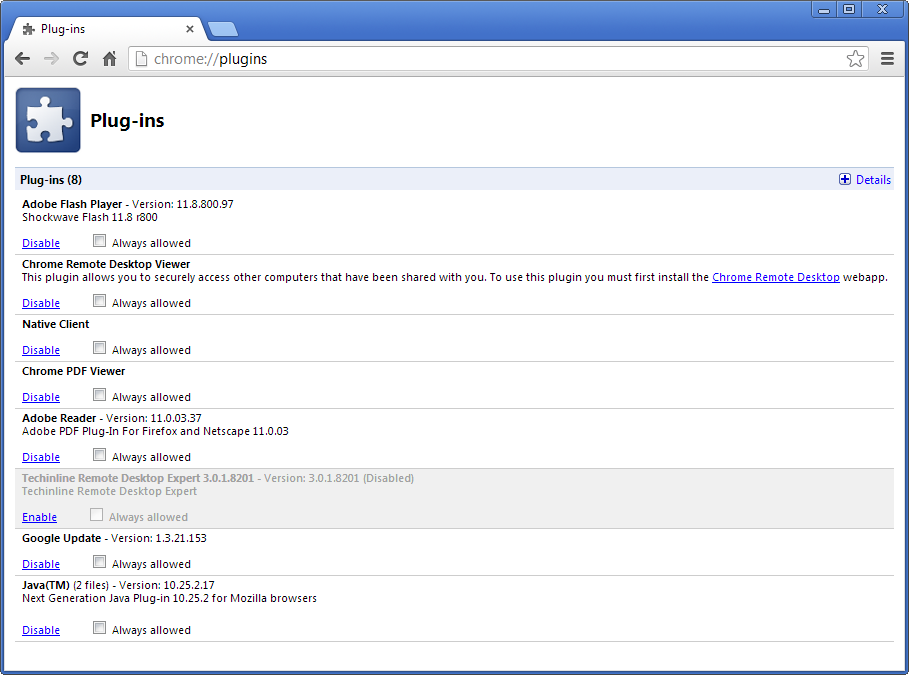
You can enable and disable Chrome Plug-ins by typing 'chrome://plugins/' in the address bar.
Chrome also supports another type of add-on called Plug-ins that you should double-check by typing the chrome://plugins/ address. These snippets of code allow Chrome to run certain forms of media, such as DivX movies or Unity Web games. Make sure to disable anything you don’t need or don’t recognize, but be cautious: You should keep the Native Client and Google Update plug-ins enabled to ensure that Chrome runs smoothly.

Eliminate annoying homepage or search redirects

Malicious adware can force you to use a tainted site as your homepage, bombarding you with nasty ads every time you open your browser. Additionally, adware networks can redirect you to their pages when you try to visit a legitimate site or perform a search. Sometimes you can remove these adverse functions by dumping malicious toolbars, add-ons, plug-ins, and extensions—but often you have to take more direct action.
If your homepage has changed, the first and most obvious thing you need to do is change it back to your desired site, close the browser, and then relaunch the browser to verify whether you have full control of the homepage setting. Changing your homepage is a pretty straightforward process in every browser. In Internet Explorer, open the Tools menu and select Internet Options. In Chrome, open the main menu, select Settings, and refer to theOn startup settings. In Firefox, open the main menu and select Options.
Afterward, if your homepage is still being forced back to the adware site, you need to confirm whether malware has edited your browser shortcut to override your homepage setting. Right-click the shortcut you use to open the browser—it’s usually either the browser icon on your desktop or the executable in your browser’s file directory—and selectProperties. If you open your browser using a pinned icon on the Windows taskbar, click theStart button, type the browser’s name, and right-click the shortcut that appears. In the shortcut’s Properties dialog box, remove any website address that’s listed after the Target location—for example, you would eliminate the “http://www.malwarebytes.com” portion shown in the screenshot below.
Double-check the properties of your browser executable to make sure that no nefarious homepage redirects are lurking in the browser’s launch string.
Of course, if your searches are being redirected when you type search strings into your browser’s address or search bar, then adware may have hijacked your search provider setting instead. To fix this problem and set your preferred search provider in Internet Explorer, open the Tools menu, select Manage add-ons, and choose Search Providers. In Chrome, open the main menu, select Settings, and refer to the Search settings. In Firefox, click the down arrow in the search box at the top of the browser and choose Manage Search Engines.

Dive into Windows’ Programs and Features

Many times you’ll discover that adware components installed on your PC can be found under the ‘Programs and Features’ list in Windows. To get there, just click the Start button and type Programs and Features into the search bar.
On some occasions these programs are inoffensive enough that modern virus and malware scanners won’t catch them, so you’ll have to shut them down manually. Therefore, it’s a good idea to check your installed-programs list as part of your browser cleansing and remove any suspicious items, even if you aren’t currently encountering adware problems. Disabling suspicious extensions in your browser will stop most adware from hammering you with ads, but more-sophisticated adware may be installed as a stand-alone program on your PC and must be uninstalled from the computer directly.
When you’re reviewing the ‘Programs and Features’ list, try sorting it by the Installed On date, since adware typically installs many components at once.

Hit the Reset button

If you’re still having problems with your browser and adware, it’s time to reset everything to factory default. Restoring your browser to its default settings will wipe out all of your saved data and customization, but it can also eliminate the adverse changes that adware and malware have made.
Before you reinstall your browser or give up entirely, try resetting it to factory-default settings to eliminate malware.
In Internet Explorer, open the Tools menu, select Internet Options, click the Advanced tab, and click the Reset button. In Firefox, open the main menu, hover over Help, clickTroubleshooting Information, and then click the Reset Firefox button. Chrome doesn’t have an easy way to restore default settings, so consider uninstalling it via the ‘Programs and Features’ list of Windows and downloading it again.

Preventing adware and malware

Now that you’ve thoroughly scrubbed your browser, keep it squeaky clean by making sure that everyone who uses the PC pays very close attention to the fine print and options while installing otherwise innocuous downloadable programs. Even seemingly trustworthy browser add-ons such as Java will try to trick you into installing unnecessary toolbars every time you download an update, so stay vigilant. When you’re surfing potentially dangerous sites and when you’re opening suspicious files—including anything you’ve downloaded via peer-to-peer or torrent networks—consider using a browser sandbox.
In browser terms, a “sandbox” is an isolated virtual environment where you can securely open suspicious programs and files. Any changes or damage—including adware and virus infections—caused by programs or files running inside the sandbox should not affect the rest of the PC. What runs in the sandbox, stays in the sandbox. Google Chrome offers built-in sandboxing protection, but I recommend that you download a third-party sandboxing program for extra security. Check your antivirus program for any sandboxing features, or download a program such as Sandboxie.
As with most PC security measures, there’s no end-all cure. Vigilance and regular checks for unwanted garbage are still the best way to prevent malware from sneaking through your browser onto your computer. Keep these browser tricks close at hand, and whatever you do, don’t click that cheesy ad!
Source
Read More
Posted in | No comments

Posted on 11:03 PM by Unknown
The Internet runs on ads, but when you see them in your browser, your first instinct should be to run the other way—fast. The lion’s share of the Internet is wallpapered with tacky ads that invite you to “Lose 15 lbs. with this 1 weird tip” and load your browser with spyware in the process. In other corners of the Web, you might download a free game or a piece of music from an untrustworthy site, ending up with malicious adware that hitched a ride along with it.
Legitimate sites do a decent job of screening their advertisers, weeding out those that spread viruses, malware, or scams. But even a single instance of malicious adware on your PC can inject bad ads into otherwise innocuous websites. Worse, the adware can change your homepage and redirect your searches and the URLs you try to visit. I’ve deep-cleaned countless PCs, and almost every time I remove viruses and malware from a machine, I find that adware was previously installed.


WIKIPEDIA
If you’re seeing ads on otherwise ad-free sites like Wikipedia, your PC probably has a bad case of adware infection.

That’s how an adware infection starts. It ends when you take a minute to deep-clean the PC, eliminating unwanted browser toolbars, add-ons, extensions, and homepage- and search-hijacking malware.

Run virus and malware scans

Obviously, the very first thing you should do when you think your PC has a malware infection is to run a complete scan with an updated antimalware utlity. Since no antivirus program can catch all the millions of infections, use a secondary scanner such as Ad-Aware, Malwarebytes, Spybot Search & Destroy, or SuperAntiSpyware. The scans may detect additional adware, viruses, and other malware. With luck, your antimalware utilities can eliminate unwanted ads, browser toolbars, and browser-hijacking malware in one go.

Disable browser toolbars

If your browser is still acting up, you need to remove every toolbar you don’t use. I recommend eliminating all downloadable toolbars from your browser. Google’s Chrome browser already includes an address bar that’s also a search engine box and a customizable bookmark menu. Legitimate toolbars from sites such as Yahoo can offer some timesaving features, especially if you’re really into Yahoo Sports or another proprietary service.
Problem is, the vast majority of adware networks on the Web aren’t ethical, and they don’t offer any useful services. Their search bars and website shortcuts almost always lead unwary users to their adware network. You’re better off eliminating every toolbar from your browser, wiping out visual clutter and a potential vector for malware. Your browser will probably show a speed boost, too.

A simple right-click on your toolbar menu allows you to disable any and all unwanted toolbars by unchecking them.

To remove toolbars from Internet Explorer, just right-click the toolbar to produce the context menu and then deselect the unwanted toolbars in the list. If prompted, make sure to selectDisable.
Firefox works much the same way—simply right-click a toolbar and switch it off—but because the browser merely hides the toolbar in question instead of disabling it completely, the toolbar could still be responsible for displaying adware. Worse, Google’s Chrome browser doesn’t offer a right-click control option at all. For disabling toolbars in Firefox and Chrome, read the next section on checking browser extensions and add-ons.

Double-check every extension and add-on

Along with toolbars, adware networks can trick visitors into installing browser add-ons and extensions to inject ads, perform search redirection, and force you to use their site as your homepage. That’s why it’s smart to check your browser add-ons and extensions regularly, disabling those you don’t use and those that look suspicious.

Internet Explorer makes it easy to disable every extension and add-on you don’t recognize or need.

In Internet Explorer, open the Tools menu and select Manage add-ons. In the menu that opens, select All add-ons. Review the list. To disable an item, right-click it and selectDisable.
If you’re a Firefox user, click the orange menu button in the top-left corner of your browser and select Add-ons from the list. Next, review both the Extensions section and the Plug-ins section, disabling anything that looks suspicious.

In Firefox, check both the Extensions and Plug-in sections.

In Chrome, simply type chrome://extensions/ into the address bar. Alternatively, open the main menu by clicking the control button in the top-right corner of the browser, and then select Settings and click Extensions. Uncheck every extension you wish to disable, or click the trash-can icon next to each extension to remove it from Chrome entirely.

You can enable and disable Chrome Plug-ins by typing 'chrome://plugins/' in the address bar.

Chrome also supports another type of add-on called Plug-ins that you should double-check by typing the chrome://plugins/ address. These snippets of code allow Chrome to run certain forms of media, such as DivX movies or Unity Web games. Make sure to disable anything you don’t need or don’t recognize, but be cautious: You should keep the Native Client and Google Update plug-ins enabled to ensure that Chrome runs smoothly.

Eliminate annoying homepage or search redirects

Malicious adware can force you to use a tainted site as your homepage, bombarding you with nasty ads every time you open your browser. Additionally, adware networks can redirect you to their pages when you try to visit a legitimate site or perform a search. Sometimes you can remove these adverse functions by dumping malicious toolbars, add-ons, plug-ins, and extensions—but often you have to take more direct action.
If your homepage has changed, the first and most obvious thing you need to do is change it back to your desired site, close the browser, and then relaunch the browser to verify whether you have full control of the homepage setting. Changing your homepage is a pretty straightforward process in every browser. In Internet Explorer, open the Tools menu and select Internet Options. In Chrome, open the main menu, select Settings, and refer to theOn startup settings. In Firefox, open the main menu and select Options.
Afterward, if your homepage is still being forced back to the adware site, you need to confirm whether malware has edited your browser shortcut to override your homepage setting. Right-click the shortcut you use to open the browser—it’s usually either the browser icon on your desktop or the executable in your browser’s file directory—and selectProperties. If you open your browser using a pinned icon on the Windows taskbar, click theStart button, type the browser’s name, and right-click the shortcut that appears. In the shortcut’s Properties dialog box, remove any website address that’s listed after the Target location—for example, you would eliminate the “http://www.malwarebytes.com” portion shown in the screenshot below.

Double-check the properties of your browser executable to make sure that no nefarious homepage redirects are lurking in the browser’s launch string.

Of course, if your searches are being redirected when you type search strings into your browser’s address or search bar, then adware may have hijacked your search provider setting instead. To fix this problem and set your preferred search provider in Internet Explorer, open the Tools menu, select Manage add-ons, and choose Search Providers. In Chrome, open the main menu, select Settings, and refer to the Search settings. In Firefox, click the down arrow in the search box at the top of the browser and choose Manage Search Engines.

Dive into Windows’ Programs and Features

Many times you’ll discover that adware components installed on your PC can be found under the ‘Programs and Features’ list in Windows. To get there, just click the Start button and type Programs and Features into the search bar.
On some occasions these programs are inoffensive enough that modern virus and malware scanners won’t catch them, so you’ll have to shut them down manually. Therefore, it’s a good idea to check your installed-programs list as part of your browser cleansing and remove any suspicious items, even if you aren’t currently encountering adware problems. Disabling suspicious extensions in your browser will stop most adware from hammering you with ads, but more-sophisticated adware may be installed as a stand-alone program on your PC and must be uninstalled from the computer directly.
When you’re reviewing the ‘Programs and Features’ list, try sorting it by the Installed On date, since adware typically installs many components at once.

Hit the Reset button

If you’re still having problems with your browser and adware, it’s time to reset everything to factory default. Restoring your browser to its default settings will wipe out all of your saved data and customization, but it can also eliminate the adverse changes that adware and malware have made.

Before you reinstall your browser or give up entirely, try resetting it to factory-default settings to eliminate malware.

In Internet Explorer, open the Tools menu, select Internet Options, click the Advanced tab, and click the Reset button. In Firefox, open the main menu, hover over Help, clickTroubleshooting Information, and then click the Reset Firefox button. Chrome doesn’t have an easy way to restore default settings, so consider uninstalling it via the ‘Programs and Features’ list of Windows and downloading it again.

Preventing adware and malware

Now that you’ve thoroughly scrubbed your browser, keep it squeaky clean by making sure that everyone who uses the PC pays very close attention to the fine print and options while installing otherwise innocuous downloadable programs. Even seemingly trustworthy browser add-ons such as Java will try to trick you into installing unnecessary toolbars every time you download an update, so stay vigilant. When you’re surfing potentially dangerous sites and when you’re opening suspicious files—including anything you’ve downloaded via peer-to-peer or torrent networks—consider using a browser sandbox.
In browser terms, a “sandbox” is an isolated virtual environment where you can securely open suspicious programs and files. Any changes or damage—including adware and virus infections—caused by programs or files running inside the sandbox should not affect the rest of the PC. What runs in the sandbox, stays in the sandbox. Google Chrome offers built-in sandboxing protection, but I recommend that you download a third-party sandboxing program for extra security. Check your antivirus program for any sandboxing features, or download a program such as Sandboxie.
As with most PC security measures, there’s no end-all cure. Vigilance and regular checks for unwanted garbage are still the best way to prevent malware from sneaking through your browser onto your computer. Keep these browser tricks close at hand, and whatever you do, don’t click that cheesy ad!
Read More
Posted in | No comments
Newer Posts Older Posts Home
Subscribe to: Posts (Atom)

Popular Posts

  • The Ubuntu guide for displaced Windows users
    With Windows 8 pushing a “touch-first” desktop interface—Microsoft’s  words , not ours—and with Valve’s  Steam on Linux  beginning to bring ...
  • Backing up your entire drive: Cloning vs. imaging
    Both cloning and imaging create an exact record of your drive or partition. I'm not just talking about the files, but the master boot re...
  • Will Samsung top Apple by withholding revolutionary tech?
    Samsung is drawing closer and closer to the technology that will transform the future of smartphones and  tablets . The company will show of...
  • Obama opposes Silicon Valley firms on immigration reform
    President Obama opposes an immigration reform bill backed by companies including Apple, Microsoft, and Adobe that would let U.S.-educated co...
  • Word vulnerability tops Microsoft's targets for Patch Tuesday
    A flaw in  Microsoft  Word ranks among the top security problems addressed by December's Patch Tuesday fixes, closing a hole that allows...
  • How to make Ubuntu Linux look like Windows 7
    Windows 8's tile-based interface puts a bold new spin on the familiar Windows interface—so bold that many long-time Windows users are th...
  • How to optimize Windows 8 on old hardware (2)
    Disable unnecessary items To further optimize Windows 8 on older hardware, we recommend disabling as many unnecessary startup items and serv...
  • How To Install MacOS On Windows Vista
    If you still think that you need macintosh computer to try MacOS, that's already in the past. Now you can try MacOS on Windows Vista. Ho...
  • Feds: MegaUpload was not entrapped
    Entrapment is one of MegaUpload's claims in its legal battle against the U.S. government. The feds are now saying this claim is "ba...
  • What it really takes to make a flexible phone (Smartphones Unlocked) Read more: http://www.cnet.com/8301-17918_1-57567014-85/what-it-really-takes-to-make-a-flexible-phone-smartphones-unlocked/#ixzz2JqPL5i4n
    A bendable screen is nice in the lab, but it will take more than flexi-glass to get your phone to touch its toes. Had Dr. Dipak Chowdhury kn...

Categories

  • apple
  • browser
  • buy
  • christmas
  • computer information
  • crack
  • cyber monday
  • download
  • files
  • firewall
  • flash disk
  • font
  • graphene
  • hard disk
  • hidden
  • Hot News
  • how to
  • intel
  • Internet
  • Internet Explorer
  • iOS
  • iPad
  • Mac
  • Malware
  • nokia
  • notebook
  • play station 4
  • processor
  • removal
  • safe
  • samsung
  • samsung. microsoft
  • security
  • sony
  • ssd
  • The Meaning Is
  • tips
  • twitter
  • ubuntu
  • video card
  • virus
  • vulnerability
  • What to do
  • windows 8
  • windows7

Blog Archive

  • ▼  2013 (90)
    • ▼  October (2)
      • How to avoid common PC building mistakes
      • Defective RAM can cause all sorts of problems. If ...
    • ►  September (6)
    • ►  August (3)
    • ►  July (4)
    • ►  June (5)
    • ►  May (9)
    • ►  April (14)
    • ►  March (11)
    • ►  February (17)
    • ►  January (19)
  • ►  2012 (27)
    • ►  December (22)
    • ►  November (5)
  • ►  2010 (4)
    • ►  June (1)
    • ►  January (3)
  • ►  2009 (32)
    • ►  December (2)
    • ►  November (11)
    • ►  October (11)
    • ►  September (2)
    • ►  March (2)
    • ►  February (4)
  • ►  2008 (39)
    • ►  October (2)
    • ►  September (2)
    • ►  August (1)
    • ►  June (1)
    • ►  May (3)
    • ►  March (1)
    • ►  February (7)
    • ►  January (22)
  • ►  2007 (46)
    • ►  December (8)
    • ►  November (9)
    • ►  September (4)
    • ►  August (2)
    • ►  July (9)
    • ►  June (14)
Powered by Blogger.

About Me

Unknown
View my complete profile