Procedure

  • Subscribe to our RSS feed.
  • Twitter
  • StumbleUpon
  • Reddit
  • Facebook
  • Digg

Friday, August 16, 2013

How to clean and secure your browser like a pro

Posted on 11:05 PM by Unknown
The Internet runs on ads, but when you see them in your browser, your first instinct should be to run the other way—fast. The lion’s share of the Internet is wallpapered with tacky ads that invite you to “Lose 15 lbs. with this 1 weird tip” and load your browser with spyware in the process. In other corners of the Web, you might download a free game or a piece of music from an untrustworthy site, ending up with malicious adware that hitched a ride along with it.
Legitimate sites do a decent job of screening their advertisers, weeding out those that spread viruses, malware, or scams. But even a single instance of malicious adware on your PC can inject bad ads into otherwise innocuous websites. Worse, the adware can change your homepage and redirect your searches and the URLs you try to visit. I’ve deep-cleaned countless PCs, and almost every time I remove viruses and malware from a machine, I find that adware was previously installed.

WIKIPEDIA
If you’re seeing ads on otherwise ad-free sites like Wikipedia, your PC probably has a bad case of adware infection.
That’s how an adware infection starts. It ends when you take a minute to deep-clean the PC, eliminating unwanted browser toolbars, add-ons, extensions, and homepage- and search-hijacking malware.

Run virus and malware scans

Obviously, the very first thing you should do when you think your PC has a malware infection is to run a complete scan with an updated antimalware utlity. Since no antivirus program can catch all the millions of infections, use a secondary scanner such as Ad-Aware, Malwarebytes, Spybot Search & Destroy, or SuperAntiSpyware. The scans may detect additional adware, viruses, and other malware. With luck, your antimalware utilities can eliminate unwanted ads, browser toolbars, and browser-hijacking malware in one go.

Disable browser toolbars

If your browser is still acting up, you need to remove every toolbar you don’t use. I recommend eliminating all downloadable toolbars from your browser. Google’s Chrome browser already includes an address bar that’s also a search engine box and a customizable bookmark menu. Legitimate toolbars from sites such as Yahoo can offer some timesaving features, especially if you’re really into Yahoo Sports or another proprietary service.
Problem is, the vast majority of adware networks on the Web aren’t ethical, and they don’t offer any useful services. Their search bars and website shortcuts almost always lead unwary users to their adware network. You’re better off eliminating every toolbar from your browser, wiping out visual clutter and a potential vector for malware. Your browser will probably show a speed boost, too.
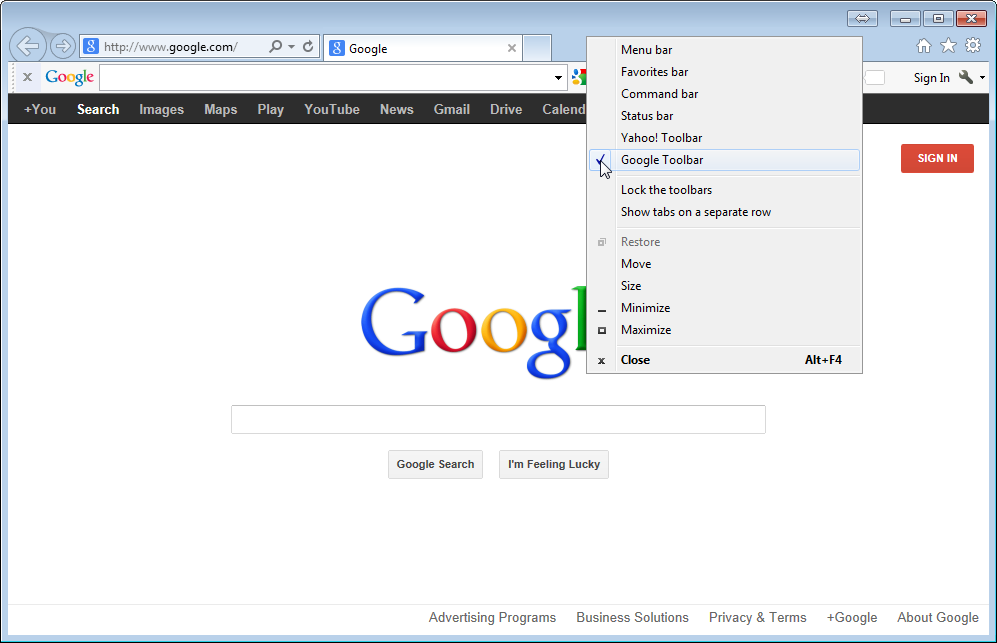
A simple right-click on your toolbar menu allows you to disable any and all unwanted toolbars by unchecking them.
To remove toolbars from Internet Explorer, just right-click the toolbar to produce the context menu and then deselect the unwanted toolbars in the list. If prompted, make sure to selectDisable.
Firefox works much the same way—simply right-click a toolbar and switch it off—but because the browser merely hides the toolbar in question instead of disabling it completely, the toolbar could still be responsible for displaying adware. Worse, Google’s Chrome browser doesn’t offer a right-click control option at all. For disabling toolbars in Firefox and Chrome, read the next section on checking browser extensions and add-ons.

Double-check every extension and add-on

Along with toolbars, adware networks can trick visitors into installing browser add-ons and extensions to inject ads, perform search redirection, and force you to use their site as your homepage. That’s why it’s smart to check your browser add-ons and extensions regularly, disabling those you don’t use and those that look suspicious.
Internet Explorer makes it easy to disable every extension and add-on you don’t recognize or need.
In Internet Explorer, open the Tools menu and select Manage add-ons. In the menu that opens, select All add-ons. Review the list. To disable an item, right-click it and selectDisable.
If you’re a Firefox user, click the orange menu button in the top-left corner of your browser and select Add-ons from the list. Next, review both the Extensions section and the Plug-ins section, disabling anything that looks suspicious.
In Firefox, check both the Extensions and Plug-in sections.
In Chrome, simply type chrome://extensions/ into the address bar. Alternatively, open the main menu by clicking the control button in the top-right corner of the browser, and then select Settings and click Extensions. Uncheck every extension you wish to disable, or click the trash-can icon next to each extension to remove it from Chrome entirely.
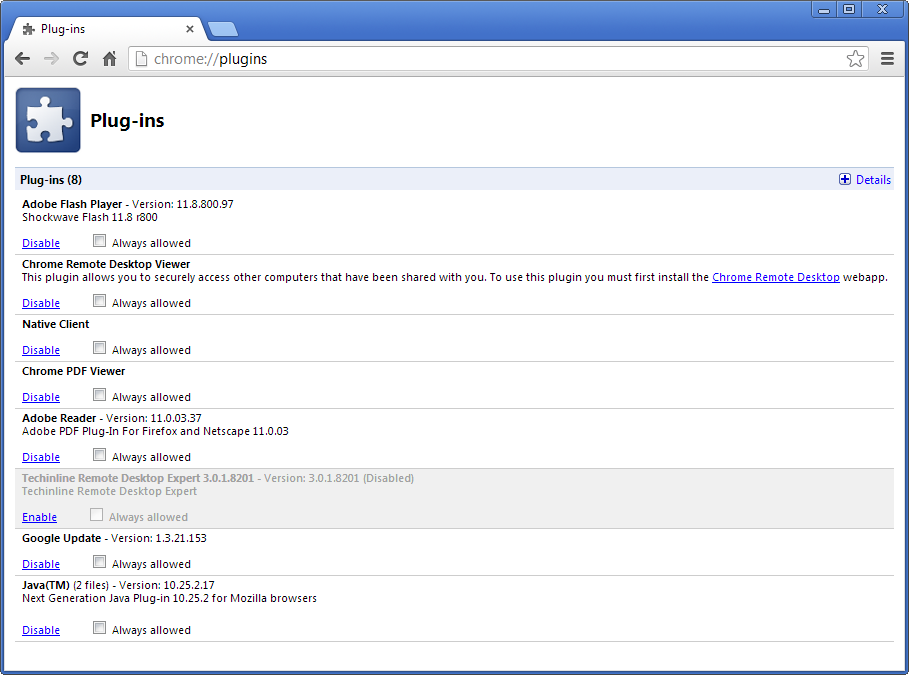
You can enable and disable Chrome Plug-ins by typing 'chrome://plugins/' in the address bar.
Chrome also supports another type of add-on called Plug-ins that you should double-check by typing the chrome://plugins/ address. These snippets of code allow Chrome to run certain forms of media, such as DivX movies or Unity Web games. Make sure to disable anything you don’t need or don’t recognize, but be cautious: You should keep the Native Client and Google Update plug-ins enabled to ensure that Chrome runs smoothly.

Eliminate annoying homepage or search redirects

Malicious adware can force you to use a tainted site as your homepage, bombarding you with nasty ads every time you open your browser. Additionally, adware networks can redirect you to their pages when you try to visit a legitimate site or perform a search. Sometimes you can remove these adverse functions by dumping malicious toolbars, add-ons, plug-ins, and extensions—but often you have to take more direct action.
If your homepage has changed, the first and most obvious thing you need to do is change it back to your desired site, close the browser, and then relaunch the browser to verify whether you have full control of the homepage setting. Changing your homepage is a pretty straightforward process in every browser. In Internet Explorer, open the Tools menu and select Internet Options. In Chrome, open the main menu, select Settings, and refer to theOn startup settings. In Firefox, open the main menu and select Options.
Afterward, if your homepage is still being forced back to the adware site, you need to confirm whether malware has edited your browser shortcut to override your homepage setting. Right-click the shortcut you use to open the browser—it’s usually either the browser icon on your desktop or the executable in your browser’s file directory—and selectProperties. If you open your browser using a pinned icon on the Windows taskbar, click theStart button, type the browser’s name, and right-click the shortcut that appears. In the shortcut’s Properties dialog box, remove any website address that’s listed after the Target location—for example, you would eliminate the “http://www.malwarebytes.com” portion shown in the screenshot below.
Double-check the properties of your browser executable to make sure that no nefarious homepage redirects are lurking in the browser’s launch string.
Of course, if your searches are being redirected when you type search strings into your browser’s address or search bar, then adware may have hijacked your search provider setting instead. To fix this problem and set your preferred search provider in Internet Explorer, open the Tools menu, select Manage add-ons, and choose Search Providers. In Chrome, open the main menu, select Settings, and refer to the Search settings. In Firefox, click the down arrow in the search box at the top of the browser and choose Manage Search Engines.

Dive into Windows’ Programs and Features

Many times you’ll discover that adware components installed on your PC can be found under the ‘Programs and Features’ list in Windows. To get there, just click the Start button and type Programs and Features into the search bar.
On some occasions these programs are inoffensive enough that modern virus and malware scanners won’t catch them, so you’ll have to shut them down manually. Therefore, it’s a good idea to check your installed-programs list as part of your browser cleansing and remove any suspicious items, even if you aren’t currently encountering adware problems. Disabling suspicious extensions in your browser will stop most adware from hammering you with ads, but more-sophisticated adware may be installed as a stand-alone program on your PC and must be uninstalled from the computer directly.
When you’re reviewing the ‘Programs and Features’ list, try sorting it by the Installed On date, since adware typically installs many components at once.

Hit the Reset button

If you’re still having problems with your browser and adware, it’s time to reset everything to factory default. Restoring your browser to its default settings will wipe out all of your saved data and customization, but it can also eliminate the adverse changes that adware and malware have made.
Before you reinstall your browser or give up entirely, try resetting it to factory-default settings to eliminate malware.
In Internet Explorer, open the Tools menu, select Internet Options, click the Advanced tab, and click the Reset button. In Firefox, open the main menu, hover over Help, clickTroubleshooting Information, and then click the Reset Firefox button. Chrome doesn’t have an easy way to restore default settings, so consider uninstalling it via the ‘Programs and Features’ list of Windows and downloading it again.

Preventing adware and malware

Now that you’ve thoroughly scrubbed your browser, keep it squeaky clean by making sure that everyone who uses the PC pays very close attention to the fine print and options while installing otherwise innocuous downloadable programs. Even seemingly trustworthy browser add-ons such as Java will try to trick you into installing unnecessary toolbars every time you download an update, so stay vigilant. When you’re surfing potentially dangerous sites and when you’re opening suspicious files—including anything you’ve downloaded via peer-to-peer or torrent networks—consider using a browser sandbox.
In browser terms, a “sandbox” is an isolated virtual environment where you can securely open suspicious programs and files. Any changes or damage—including adware and virus infections—caused by programs or files running inside the sandbox should not affect the rest of the PC. What runs in the sandbox, stays in the sandbox. Google Chrome offers built-in sandboxing protection, but I recommend that you download a third-party sandboxing program for extra security. Check your antivirus program for any sandboxing features, or download a program such as Sandboxie.
As with most PC security measures, there’s no end-all cure. Vigilance and regular checks for unwanted garbage are still the best way to prevent malware from sneaking through your browser onto your computer. Keep these browser tricks close at hand, and whatever you do, don’t click that cheesy ad!
Source
Read More
Posted in | No comments

Posted on 11:03 PM by Unknown
The Internet runs on ads, but when you see them in your browser, your first instinct should be to run the other way—fast. The lion’s share of the Internet is wallpapered with tacky ads that invite you to “Lose 15 lbs. with this 1 weird tip” and load your browser with spyware in the process. In other corners of the Web, you might download a free game or a piece of music from an untrustworthy site, ending up with malicious adware that hitched a ride along with it.
Legitimate sites do a decent job of screening their advertisers, weeding out those that spread viruses, malware, or scams. But even a single instance of malicious adware on your PC can inject bad ads into otherwise innocuous websites. Worse, the adware can change your homepage and redirect your searches and the URLs you try to visit. I’ve deep-cleaned countless PCs, and almost every time I remove viruses and malware from a machine, I find that adware was previously installed.


WIKIPEDIA
If you’re seeing ads on otherwise ad-free sites like Wikipedia, your PC probably has a bad case of adware infection.

That’s how an adware infection starts. It ends when you take a minute to deep-clean the PC, eliminating unwanted browser toolbars, add-ons, extensions, and homepage- and search-hijacking malware.

Run virus and malware scans

Obviously, the very first thing you should do when you think your PC has a malware infection is to run a complete scan with an updated antimalware utlity. Since no antivirus program can catch all the millions of infections, use a secondary scanner such as Ad-Aware, Malwarebytes, Spybot Search & Destroy, or SuperAntiSpyware. The scans may detect additional adware, viruses, and other malware. With luck, your antimalware utilities can eliminate unwanted ads, browser toolbars, and browser-hijacking malware in one go.

Disable browser toolbars

If your browser is still acting up, you need to remove every toolbar you don’t use. I recommend eliminating all downloadable toolbars from your browser. Google’s Chrome browser already includes an address bar that’s also a search engine box and a customizable bookmark menu. Legitimate toolbars from sites such as Yahoo can offer some timesaving features, especially if you’re really into Yahoo Sports or another proprietary service.
Problem is, the vast majority of adware networks on the Web aren’t ethical, and they don’t offer any useful services. Their search bars and website shortcuts almost always lead unwary users to their adware network. You’re better off eliminating every toolbar from your browser, wiping out visual clutter and a potential vector for malware. Your browser will probably show a speed boost, too.

A simple right-click on your toolbar menu allows you to disable any and all unwanted toolbars by unchecking them.

To remove toolbars from Internet Explorer, just right-click the toolbar to produce the context menu and then deselect the unwanted toolbars in the list. If prompted, make sure to selectDisable.
Firefox works much the same way—simply right-click a toolbar and switch it off—but because the browser merely hides the toolbar in question instead of disabling it completely, the toolbar could still be responsible for displaying adware. Worse, Google’s Chrome browser doesn’t offer a right-click control option at all. For disabling toolbars in Firefox and Chrome, read the next section on checking browser extensions and add-ons.

Double-check every extension and add-on

Along with toolbars, adware networks can trick visitors into installing browser add-ons and extensions to inject ads, perform search redirection, and force you to use their site as your homepage. That’s why it’s smart to check your browser add-ons and extensions regularly, disabling those you don’t use and those that look suspicious.

Internet Explorer makes it easy to disable every extension and add-on you don’t recognize or need.

In Internet Explorer, open the Tools menu and select Manage add-ons. In the menu that opens, select All add-ons. Review the list. To disable an item, right-click it and selectDisable.
If you’re a Firefox user, click the orange menu button in the top-left corner of your browser and select Add-ons from the list. Next, review both the Extensions section and the Plug-ins section, disabling anything that looks suspicious.

In Firefox, check both the Extensions and Plug-in sections.

In Chrome, simply type chrome://extensions/ into the address bar. Alternatively, open the main menu by clicking the control button in the top-right corner of the browser, and then select Settings and click Extensions. Uncheck every extension you wish to disable, or click the trash-can icon next to each extension to remove it from Chrome entirely.

You can enable and disable Chrome Plug-ins by typing 'chrome://plugins/' in the address bar.

Chrome also supports another type of add-on called Plug-ins that you should double-check by typing the chrome://plugins/ address. These snippets of code allow Chrome to run certain forms of media, such as DivX movies or Unity Web games. Make sure to disable anything you don’t need or don’t recognize, but be cautious: You should keep the Native Client and Google Update plug-ins enabled to ensure that Chrome runs smoothly.

Eliminate annoying homepage or search redirects

Malicious adware can force you to use a tainted site as your homepage, bombarding you with nasty ads every time you open your browser. Additionally, adware networks can redirect you to their pages when you try to visit a legitimate site or perform a search. Sometimes you can remove these adverse functions by dumping malicious toolbars, add-ons, plug-ins, and extensions—but often you have to take more direct action.
If your homepage has changed, the first and most obvious thing you need to do is change it back to your desired site, close the browser, and then relaunch the browser to verify whether you have full control of the homepage setting. Changing your homepage is a pretty straightforward process in every browser. In Internet Explorer, open the Tools menu and select Internet Options. In Chrome, open the main menu, select Settings, and refer to theOn startup settings. In Firefox, open the main menu and select Options.
Afterward, if your homepage is still being forced back to the adware site, you need to confirm whether malware has edited your browser shortcut to override your homepage setting. Right-click the shortcut you use to open the browser—it’s usually either the browser icon on your desktop or the executable in your browser’s file directory—and selectProperties. If you open your browser using a pinned icon on the Windows taskbar, click theStart button, type the browser’s name, and right-click the shortcut that appears. In the shortcut’s Properties dialog box, remove any website address that’s listed after the Target location—for example, you would eliminate the “http://www.malwarebytes.com” portion shown in the screenshot below.

Double-check the properties of your browser executable to make sure that no nefarious homepage redirects are lurking in the browser’s launch string.

Of course, if your searches are being redirected when you type search strings into your browser’s address or search bar, then adware may have hijacked your search provider setting instead. To fix this problem and set your preferred search provider in Internet Explorer, open the Tools menu, select Manage add-ons, and choose Search Providers. In Chrome, open the main menu, select Settings, and refer to the Search settings. In Firefox, click the down arrow in the search box at the top of the browser and choose Manage Search Engines.

Dive into Windows’ Programs and Features

Many times you’ll discover that adware components installed on your PC can be found under the ‘Programs and Features’ list in Windows. To get there, just click the Start button and type Programs and Features into the search bar.
On some occasions these programs are inoffensive enough that modern virus and malware scanners won’t catch them, so you’ll have to shut them down manually. Therefore, it’s a good idea to check your installed-programs list as part of your browser cleansing and remove any suspicious items, even if you aren’t currently encountering adware problems. Disabling suspicious extensions in your browser will stop most adware from hammering you with ads, but more-sophisticated adware may be installed as a stand-alone program on your PC and must be uninstalled from the computer directly.
When you’re reviewing the ‘Programs and Features’ list, try sorting it by the Installed On date, since adware typically installs many components at once.

Hit the Reset button

If you’re still having problems with your browser and adware, it’s time to reset everything to factory default. Restoring your browser to its default settings will wipe out all of your saved data and customization, but it can also eliminate the adverse changes that adware and malware have made.

Before you reinstall your browser or give up entirely, try resetting it to factory-default settings to eliminate malware.

In Internet Explorer, open the Tools menu, select Internet Options, click the Advanced tab, and click the Reset button. In Firefox, open the main menu, hover over Help, clickTroubleshooting Information, and then click the Reset Firefox button. Chrome doesn’t have an easy way to restore default settings, so consider uninstalling it via the ‘Programs and Features’ list of Windows and downloading it again.

Preventing adware and malware

Now that you’ve thoroughly scrubbed your browser, keep it squeaky clean by making sure that everyone who uses the PC pays very close attention to the fine print and options while installing otherwise innocuous downloadable programs. Even seemingly trustworthy browser add-ons such as Java will try to trick you into installing unnecessary toolbars every time you download an update, so stay vigilant. When you’re surfing potentially dangerous sites and when you’re opening suspicious files—including anything you’ve downloaded via peer-to-peer or torrent networks—consider using a browser sandbox.
In browser terms, a “sandbox” is an isolated virtual environment where you can securely open suspicious programs and files. Any changes or damage—including adware and virus infections—caused by programs or files running inside the sandbox should not affect the rest of the PC. What runs in the sandbox, stays in the sandbox. Google Chrome offers built-in sandboxing protection, but I recommend that you download a third-party sandboxing program for extra security. Check your antivirus program for any sandboxing features, or download a program such as Sandboxie.
As with most PC security measures, there’s no end-all cure. Vigilance and regular checks for unwanted garbage are still the best way to prevent malware from sneaking through your browser onto your computer. Keep these browser tricks close at hand, and whatever you do, don’t click that cheesy ad!
Read More
Posted in | No comments

Sunday, August 4, 2013

Three old Windows right-click tricks that still rock

Posted on 12:41 AM by Unknown
They say you can't teach an old dog new tricks. But what about old tricks? As a longtime Windows user, I can tell you that occasionally I get so accustomed to doing things a certain way, I forget that there are faster, easier ways.
With that in mind, I've rounded up three right-click tricks you may have forgotten. Or never learned. Either way, you'll be glad you know them. (Note that these are all for Windows 7/8. They may be available in XP and/or Vista as well--I don't recall--but I no longer have those operating systems on which to double-check.)
1. Right-click the desktop for bigger icons
On today's higher-resolution displays, you may find your desktop icons a little small for your liking. If so, right-click any empty spot on the desktop, mouse over View, and then click either Medium icons or Large icons. Presto! Bigger icons.
On my 13.3-inch laptop, which has a rather high native resolution (1,920 x 1,080), the Medium setting is definitely preferable.
2. Right-click Taskbar icons for recent items and shortcuts
See those icons in your Taskbar? Mine include not only Chrome and Explorer, but also Outlook, Word, and Excel.
When you right-click any of them, Windows gives you a list of time-saving shortcuts: recent documents, most-visited sites, new appointment (in the case of Outlook), and so on. In other words, instead of running an app and then going about your business, this lets you choose your business and launch the app at the same time.
It's a small thing, but it's definitely one of my favorite little Windows tricks.
3. Right-click desktop icons to pin to Start Menu or Taskbar
Speaking of icons, when you right-click any icon that's on your desktop, you'll see two options in the list that appears: Pin to Start and Pin to Taskbar.
These are great for putting your favorite programs iin your preferred launching area. For example, some old-school users still like to start with the Start Menu. Personally, I'm a fan of keeping my most-used apps on the Taskbar. This right-click option makes either one a snap.
Source
Read More
Posted in | No comments

Friday, July 26, 2013

Put your passwords in your pocket and take them everywhere you go

Posted on 5:01 AM by Unknown
My own personal favorite password manager, Password Safe, isn't officially portable. But in practice, it sort of is.
After you install Password Safe onto a computer, you can drag and drop the program folder onto a flash drive and safely remove the drive. Then you can connect it to another Windows PC and launch Password Safe. You'll want to keep your password database file on the flash drive too, of course.
But this doesn't work perfectly. It has two flaws, neither of them serious.
First, when you launch Password Safe from the flash drive and browse to open a password database file, the program will default to your Documents folder. You'll have to navigate drives and folders to get to the file, which will be on the flash drive.
Second, when you close the program, it leaves an icon running in the notification area. You must right-click that icon and exit the program before Windows will allow you to safely remove the flash drive.
You can find unofficial portable versions of Password Safe around the Internet. I've tried a couple, and they both had these same two problems.
Password Safe isn't the only option. The popularKeepass program is available in a portable version, which lacks Password Safe's portable annoyances.
Another option: If you have a smartphone or a tablet, both Password Safe and Keepass are available as Android and iOS apps.
Source
Read More
Posted in | No comments

Thursday, July 18, 2013

Three cool ways to tweak File Explorer in Windows 8

Posted on 4:44 PM by Unknown
Microsoft may have bungled a few things with Windows 8 (snark reply: "Just a few?!"), but File Explorer isn't one of them.
For one thing, the file manager finally earned a home on the Taskbar (even if you have to switch to the desktop to find it). Even better, Microsoft endowed it with the now-familiar Ribbon interface, making for much easier navigation of your files (and Explorer itself).
However, I think it could be even better with a little tweaking. Here are three simple changes you can make to improve the File Explorer experience:

1. Customize the Quick Access Toolbar. See those tiny icons in the upper-left corner of the File Explorer window? Click the even tinier arrow next to them for a list of additional functions you can enable. Why add, say, a Delete icon when Explorer already has one? Because the latter appears only when you're viewing the Home tab. Put it on the Toolbar, however, and it's always just a click away.
2. Show all your folders. In an effort to keep things compact, Explorer shows an abbreviated list of your folders in the lefthand navigation pane. I'd rather see everything, which is possible by clicking the View tab, then the Navigation pane icon. Now simply clickShow all folders.
3. Improve your view. I find that very few users ever monkey with Explorer's default view for files, even though it's often very valuable to do so. Thankfully, Explorer now gives you a preview of what each view will look like, a huge boon to users who might get confused by a sudden change. Just click the View tab, then mouse over the various options in the Layout section: Extra large icons, List, Details, etc. In the file area you'll immediately see how that view would look. Like what you see? Click the setting to implement it.
Source
Read More
Posted in | No comments

Sunday, July 7, 2013

How to safely remove a USB drive even when Windows says it isn't safe to do so

Posted on 2:32 AM by Unknown
Windows' built-in solution usually works: Click the Safely Remove Hardware icon in the notification area (aka the system tray or the systray) and select the drive. When you get the "Safe To Remove Hardware" message, it's safe to remove the hardware.
But sometimes, "usually" isn't good enough, and Windows instead tells you that "This device is currently in use."

But Windows won't tell you what's using the device. Without that information, it's tough to know how to fix the problem.
Guessing makes a good start. Close all of your Windows Explorer windows, along with any programs that might be holding onto a file from the drive. Then try the Safely Remove Hardware icon again.
If that doesn't work, you can simply shut down your computer--not hibernate it or put it in sleep mode--but shut it down completely. That always works, but it takes time and interrupts your workflow.
In the original forum discussion, Flashorn offered an improved variation: Log off, log on, and try again. It's faster than a full shutdown and reboot, and it will probably close whatever process is causing the problem. But it still takes time.
Which is why I prefer Unlocker. Intended to help you free up files that Windows won't let you delete, it can also help free external drives. Unlocker doesn't cost anything, although you're encouraged to make a $5 donation.
Download and install the program. Then, the next time Windows tells you that a "device is currently in use," right-click the drive and select Unlocker. The program will tell you what process or processes are causing the problem.
It will also offer solutions. It can kill the process(es), but that can make Windows unstable. It can also try to unlock the files from one or all processes without killing them.
My favorite solution isn't on the Unlocker menu. Once you know what process is causing the problem, you can usually figure out what application you need to close--they generally have the same name. So you just close that program manually, saving all appropriate files, then use the Safely Remove Hardware icon again.
Source
Read More
Posted in | No comments

Wednesday, July 3, 2013

Here's what an eavesdropper sees when you use an unsecured Wi-Fi hotspot

Posted on 11:58 PM by Unknown
You’ve probably read at least one story with warnings about using unsecure public Wi-Fi hotspots, so you know that eavesdroppers can capture information traveling over those networks. But nothing gets the point across as effectively as seeing the snooping in action. So I parked myself at my local coffee shop the other day to soak up the airwaves and see what I could see.
My intent wasn't to hack anyone's computer or device—that's illegal—but just to listen. It’s similar to listening in on someone’s CB or walkie-talkie radio conversation. Like CBs and walkie-talkies, Wi-Fi networks operate on public airwaves that anyone nearby can tune into.
As you'll see, it’s relatively easy to capture sensitive communication at the vast majority of public hotspots—locations like cafes, restaurants, airports, hotels, and other public places. You can snag emails, passwords, and unencrypted instant messages, and you can hijack unsecured logins to popular websites. Fortunately, ways exist to protect your online activity while you’re out-and-about with your laptop, tablet, and other Wi-Fi gadgets. I'll touch on those, too.

Capturing webpages

I opened my laptop at the coffee shop and began capturing Wi-Fi signals, technically called 802.11 packets, with the help of a free trial of a wireless network analyzer. The packets appeared on screen in real time as they were captured—much more quickly than I could read them—so I stopped capturing after a few minutes to analyze what I had vacuumed up. Note: You can click on any of these screenshots to view larger versions that are easier to read.
My own website, captured via the hotspot packets and reassembled for viewing.
I first searched for packets containing HTML code, to see which websites other hotspot users were browsing. While I did see activity from other patrons, I didn’t capture anything interesting, so I visited my own website—www.egeier.com—on my smartphone.
This is a copy of the email I sent (and subsequently received) using my smartphone connected to the hotspot.
The raw packets with HTML code looked like gibberish, but as you can see above, the trial network analyzer I used reassembled the packets and displayed them as a regular webpage view. The formatting was slightly off and some of the images were missing, but plenty of information still came through.
I didn’t find anyone else sending or receiving emails during my visit, but I did discover the test messages I sent and received via my smartphone while it was connected to the hotspot. Since I use an app to connect to my email service via POP3 without encryption, you could have seen my login credentials along with the message (I've blurred the username and password in the screenshot).
This is all the information someone would need to configure their email client to use my account and start receiving my emails. They might also be able to send emails from my account.
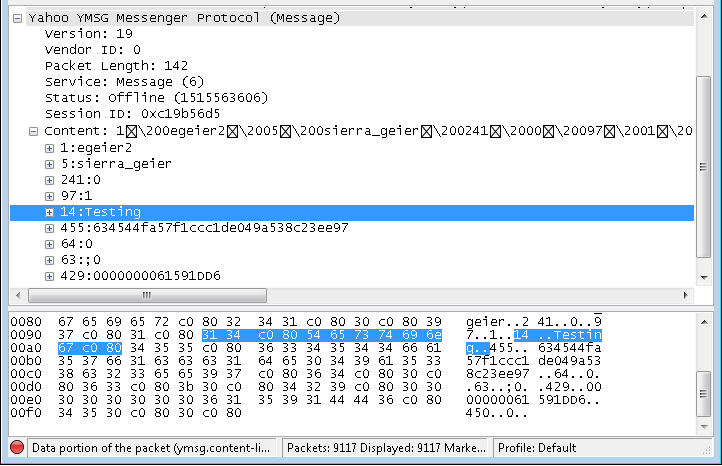
And these are the packets that went over the network when I sent an instant message using Yahoo Instant Messenger.
I also used Yahoo Messenger to send a message while I was capturing Wi-Fi signals. Sure enough, the tool plucked that information out of the air, too. You should never use an unencrypted instant-messaging service with any expectation of privacy.

Capturing FTP login credentials

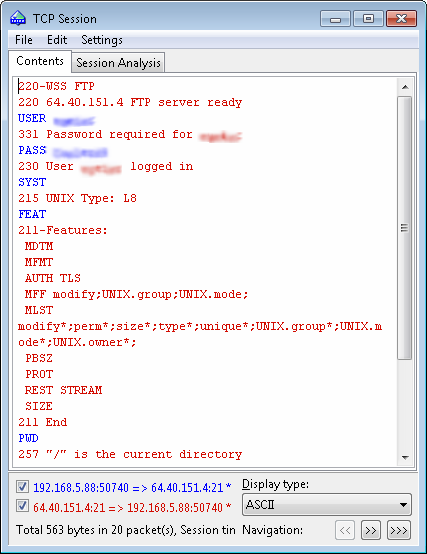
If you still use FTP (File Transfer Protocol) to download, upload, or share files, you should avoid connecting to them over unsecured hotspots. Most FTP servers use unencrypted connections, so both login credentials and content are sent in plain text, where any eavesdropper can easily capture them.
These captured packets reveal the username and password securing my FTP server (I've blurred them in this screenshot).
While using my laptop to connect to my own Web server’s FTP server, I was able to capture the packets containing my login ID and password—details that would have enabled any nearby eavesdropper to to gain unfettered access to my websites.

Hijacking accounts

Computers aren’t the only devices susceptible to eavesdropping. I also ran an app called DroidSheep on my spare rooted Android smartphone. This app can be used to gain access to private accounts on popular Web services, such as Gmail, LinkedIn, Yahoo, and Facebook.
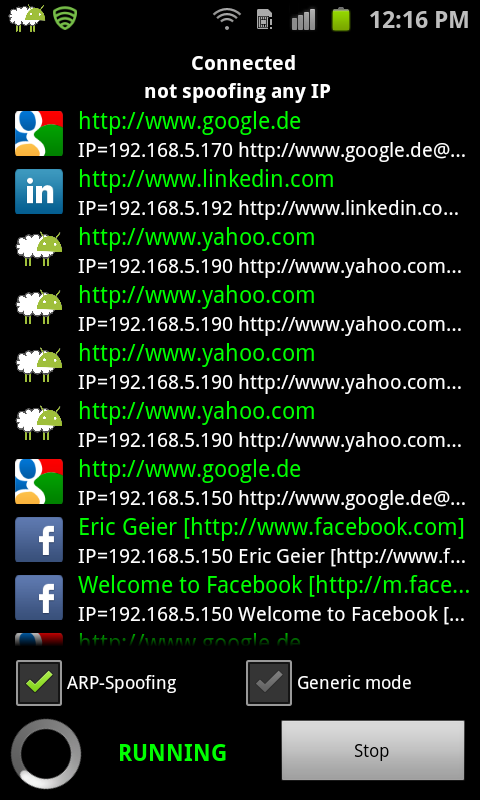
DroidSheep looks for and lists any unsecure logins to popular websites. While it doesn’t capture the passwords to those sites, it can exploit a vulnerability that allows you to open the site using another person’s current session, giving you full access to their account in the process.
As you can see from the screenshot below, DroidSheep detected Google, LinkedIn, and Yahoo logins from other people who were connected to the hotspot, as well as the Facebook login I made on my other smartphone.
DroidSheep detected other users' log-ins, which means those accounts were vulnerable to hijacking.

.
I couldn’t legally access other people’s logins, of course, but I did open my own Facebook login.
Using DroidSheep, I was able to access my own Facebook page without providing a user ID or password. I could have done the same with any other patron's accounts if they were logged in.
Once I’d done that, I could magically access my Facebook account on that rooted Android phone (see the screen at lower right) without ever providing my username or password from that device.

How to use Wi-Fi hotspots securely

Now that you’ve seen just how easy it is for someone to eavesdrop on your Wi-Fi, here's how you can use a public hotspot with some degree of security:
  • Every time you log in to a website, make sure that your connection is encrypted. The URL address should start with https instead of http.
  • You also need to make sure that the connection stays encrypted for all of your online session. Some websites, including Facebook, will encrypt your log-in and then return you to an unsecured session—leaving you vulnerable to hijacking, as discussed earlier.
  • Many sites give you the option of encrypting your entire session. You can do this with Facebook by enabling Secure Browsing in the Security settings.
  • When you check your email, try to login via the Web browser and ensure that your connection is encrypted (again, look for https at the beginning of the URL). If you use an email client such as Outlook, make sure your POP3 or IMAP and SMTP accounts are configured with encryption turned on.
  • Never use FTP or other services that aren’t encrypted.
  • To encrypt your Web browsing and all other online activity, use a VPN, or virtual private network (this article will show you how).
  • Keep in mind that private networks have similar vulnerabilities: Anyone nearby can eavesdrop on the network. Enabling WPA or WPA2 security will encrypt the Wi-Fi traffic, obscuring the actual communications, but anyone who also has that password will be able to snoop on the packets traveling over the network. This is particularly important for small businesses that don’t use the enterprise (802.1X) mode of WPA or WPA2 security that prevents user-to-user eavesdropping.
Source
Read More
Posted in | No comments
Newer Posts Older Posts Home
Subscribe to: Posts (Atom)

Popular Posts

  • The Ubuntu guide for displaced Windows users
    With Windows 8 pushing a “touch-first” desktop interface—Microsoft’s  words , not ours—and with Valve’s  Steam on Linux  beginning to bring ...
  • Backing up your entire drive: Cloning vs. imaging
    Both cloning and imaging create an exact record of your drive or partition. I'm not just talking about the files, but the master boot re...
  • Will Samsung top Apple by withholding revolutionary tech?
    Samsung is drawing closer and closer to the technology that will transform the future of smartphones and  tablets . The company will show of...
  • Obama opposes Silicon Valley firms on immigration reform
    President Obama opposes an immigration reform bill backed by companies including Apple, Microsoft, and Adobe that would let U.S.-educated co...
  • Word vulnerability tops Microsoft's targets for Patch Tuesday
    A flaw in  Microsoft  Word ranks among the top security problems addressed by December's Patch Tuesday fixes, closing a hole that allows...
  • How to make Ubuntu Linux look like Windows 7
    Windows 8's tile-based interface puts a bold new spin on the familiar Windows interface—so bold that many long-time Windows users are th...
  • How to optimize Windows 8 on old hardware (2)
    Disable unnecessary items To further optimize Windows 8 on older hardware, we recommend disabling as many unnecessary startup items and serv...
  • How To Install MacOS On Windows Vista
    If you still think that you need macintosh computer to try MacOS, that's already in the past. Now you can try MacOS on Windows Vista. Ho...
  • Feds: MegaUpload was not entrapped
    Entrapment is one of MegaUpload's claims in its legal battle against the U.S. government. The feds are now saying this claim is "ba...
  • What it really takes to make a flexible phone (Smartphones Unlocked) Read more: http://www.cnet.com/8301-17918_1-57567014-85/what-it-really-takes-to-make-a-flexible-phone-smartphones-unlocked/#ixzz2JqPL5i4n
    A bendable screen is nice in the lab, but it will take more than flexi-glass to get your phone to touch its toes. Had Dr. Dipak Chowdhury kn...

Categories

  • apple
  • browser
  • buy
  • christmas
  • computer information
  • crack
  • cyber monday
  • download
  • files
  • firewall
  • flash disk
  • font
  • graphene
  • hard disk
  • hidden
  • Hot News
  • how to
  • intel
  • Internet
  • Internet Explorer
  • iOS
  • iPad
  • Mac
  • Malware
  • nokia
  • notebook
  • play station 4
  • processor
  • removal
  • safe
  • samsung
  • samsung. microsoft
  • security
  • sony
  • ssd
  • The Meaning Is
  • tips
  • twitter
  • ubuntu
  • video card
  • virus
  • vulnerability
  • What to do
  • windows 8
  • windows7

Blog Archive

  • ▼  2013 (90)
    • ▼  October (2)
      • How to avoid common PC building mistakes
      • Defective RAM can cause all sorts of problems. If ...
    • ►  September (6)
    • ►  August (3)
    • ►  July (4)
    • ►  June (5)
    • ►  May (9)
    • ►  April (14)
    • ►  March (11)
    • ►  February (17)
    • ►  January (19)
  • ►  2012 (27)
    • ►  December (22)
    • ►  November (5)
  • ►  2010 (4)
    • ►  June (1)
    • ►  January (3)
  • ►  2009 (32)
    • ►  December (2)
    • ►  November (11)
    • ►  October (11)
    • ►  September (2)
    • ►  March (2)
    • ►  February (4)
  • ►  2008 (39)
    • ►  October (2)
    • ►  September (2)
    • ►  August (1)
    • ►  June (1)
    • ►  May (3)
    • ►  March (1)
    • ►  February (7)
    • ►  January (22)
  • ►  2007 (46)
    • ►  December (8)
    • ►  November (9)
    • ►  September (4)
    • ►  August (2)
    • ►  July (9)
    • ►  June (14)
Powered by Blogger.

About Me

Unknown
View my complete profile